console
class MarkdownParser {
compile(nodes) {
let matchArr
let html = ''
for (let i = 0, len = nodes.length; i < len; i++) {
let text = ''
let index = 0
const node = nodes[i]
if (node.nodeType === Node.ELEMENT_NODE) {
if (node.innerHTML === '<br>') {
html += `<div></div>`
while (nodes[i + 1].nodeType === Node.ELEMENT_NODE && nodes[i + 1].innerHTML === '<br>') {
i++
}
continue
}
index = node.dataset.index
text = node.textContent.trim()
} else {
text = node.nodeValue.trim()
}
matchArr = text.match(/^#\s/)
|| text.match(/^##\s/)
|| text.match(/^###\s/)
|| text.match(/^####\s/)
|| text.match(/^#####\s/)
|| text.match(/^######\s/)
|| text.match(/^\*{3,}/)
|| text.match(/^>/)
|| text.match(/^\*\s/)
|| text.match(/^\d*\.\s/)
|| text.match(/^```/)
|| text.match(/^\|.*\|/)
if (matchArr) {
let temp = ''
const re1 = /^>/
const re2 = /^\*\s/
const re3 = /^\d*\.\s/
const re4 = /^```/
const re5 = /^\|.*\|/
switch(matchArr[0]) {
case '# ':
html += `<h1 data-index="${index}">` + this.format(text.substring(2)) + '</h1>'
break
case '## ':
html += `<h2 data-index="${index}">` + this.format(text.substring(3)) + '</h2>'
break
case '### ':
html += `<h3 data-index="${index}">` + this.format(text.substring(4)) + '</h3>'
break
case '#### ':
html += `<h4 data-index="${index}">` + this.format(text.substring(5)) + '</h4>'
break
case '##### ':
html += `<h5 data-index="${index}">` + this.format(text.substring(6)) + '</h5>'
break
case '###### ':
html += `<h6 data-index="${index}">` + this.format(text.substring(7)) + '</h6>'
break
case text.match(/^\*{3,}/) && text.match(/^\*{3,}/)[0]:
html += text.replace(/^\*{3,}/g, '<hr>')
break
case '>':
while (i < len && nodes[i].textContent.match(re1)) {
const str = nodes[i].textContent
temp += '<div>' + this.format(str.slice(1)) + '</div>'
i++
}
i--
html += `<blockquote data-index="${index}">` + temp + '</blockquote>'
break
case '* ':
while (i < len && nodes[i].textContent?.match(re2)) {
const str = nodes[i].textContent
temp += `<li data-index="${nodes[i]?.dataset?.index}">` + this.format(str.slice(2)) + '</li>'
i++
}
i--
html += `<ul data-index="${index}">` + temp + '</ul>'
break
case text.match(/^\d*\.\s/) && text.match(/^\d*\.\s/)[0]:
while (i < len && nodes[i].textContent?.match(re3)) {
const str = nodes[i].textContent
temp += `<li data-index="${nodes[i]?.dataset?.index}">` + this.format(str.replace(/^\d*\.\s/, '')) + '</li>'
i++
}
i--
html += `<ol data-index="${index}">` + temp + '</ol>'
break
case '```':
i++
while (i < len && !re4.test(nodes[i].textContent)) {
temp += `<div data-index="${nodes[i]?.dataset?.index}">` + escapeHTML(nodes[i].textContent) + '</div>'
i++
}
html += `<pre data-index="${index}"><code>` + temp + '</code></pre>'
break
case text.match(/^\|.*\|/) && text.match(/^\|.*\|/)[0]:
let thRe = /^\[th\]/
let arr, j, jlen
while (i < len && re5.test(nodes[i].textContent)) {
arr = nodes[i].textContent.split('|')
temp += `<tr data-index="${nodes[i]?.dataset?.index}">`
for (j = 1, jlen = arr.length - 1; j < jlen; j++) {
if (thRe.test(arr[1])) {
temp += '<th>' + arr[j] + '</th>'
} else {
temp += '<td>' + arr[j] + '</td>'
}
}
temp += '</tr>'
temp = temp.replace('[th]', '')
i++
}
html += '<table>' + temp + '</table>'
break
}
} else if (text) {
html += `<div data-index="${index}">` + this.format(text) + '</div>'
}
}
return html
}
format(str) {
str = str.replace(/\s/g, ' ')
const bold = str.match(/\*{2}[^*].*?\*{2}/g)
if (bold) {
for (let i = 0, len = bold.length; i < len; i++) {
str = str.replace(bold[i], '<b>' + bold[i].substring(2, bold[i].length - 2) + '</b>')
}
}
const italic = str.match(/\*[^*].*?\*/g)
if (italic) {
for (let i = 0, len = italic.length; i < len; i++) {
str = str.replace(italic[i], '<i>' + italic[i].substring(1, italic[i].length - 1) + '</i>')
}
}
const code = str.match(/`[^`]*`/g)
if (code) {
for (let i = 0, len = code.length; i < len; i++) {
str = str.replace(code[i], '<code>' + code[i].substring(1, code[i].length - 1) + '</code>')
}
}
const img = str.match(/!\[.*\]\(.*\)/g)
const re1 = /\(.*\)/
const re2 = /\[.*\]/
if (img) {
for (let i = 0, len = img.length; i < len; i++) {
const url = img[i].match(re1)[0]
const title = img[i].match(re2)[0]
str = str.replace(img[i], '<img src=' + url.substring(1, url.length - 1) + ' alt=' + title.substring(1, title.length -1) + '>')
}
}
const a = str.match(/\[.*?\]\(.*?\)/g)
if (a) {
for (let i = 0, len = a.length; i < len; i++) {
const url = a[i].match(re1)[0]
const title = a[i].match(re2)[0]
str = str.replace(a[i], '<a href=' + url.substring(1, url.length - 1) + '>' + title.substring(1, title.length -1) + '</a>')
}
}
return escapeHTML2(str)
}
}
function escapeHTML(html) {
return html.replace(/</g, '<').replace(/>/g, '>')
}
function escapeHTML2(html) {
return html.replace(/<(\/)?script>/g, '<$1script>')
}
function $(selector) {
return document.querySelector(selector)
}
function changeCursorPosition(node) {
const selection = window.getSelection()
selection.removeAllRanges()
const range = document.createRange()
range.selectNode(node)
selection.addRange(range)
selection.collapseToEnd()
}
function clearTextStyle(e) {
e.preventDefault()
let text
const clp = (e.originalEvent || e).clipboardData
if (clp === undefined || clp === null) {
text = window.clipboardData.getData('text') || ''
if (text !== '') {
if (window.getSelection) {
var newNode = document.createElement('span')
newNode.innerHTML = text
window.getSelection().getRangeAt(0).insertNode(newNode)
} else {
document.selection.createRange().pasteHTML(text)
}
}
} else {
text = clp.getData('text/plain') || ''
if (text !== '') {
document.execCommand('insertText', false, text)
}
}
}
function throttle(delay) {
let waitForCallFunc
let canCall = true
return function helper(callback, ...args) {
if (!canCall) {
if (callback) waitForCallFunc = callback
return
}
callback(...args)
canCall = false
setTimeout(() => {
canCall = true
if (waitForCallFunc) {
helper(waitForCallFunc, ...args)
waitForCallFunc = null
}
}, delay)
}
}
function debounce(delay) {
let timer
return function(callback, ...args) {
clearTimeout(timer)
timer = setTimeout(() => callback.call(null, ...args), delay)
}
}
function getHeightToTop(dom) {
let height = dom.offsetTop
let parent = dom.offsetParent
while (parent) {
height += parent.offsetTop
parent = parent.offsetParent
}
return height
}
function isInScreen(dom) {
const { top, bottom } = dom.getBoundingClientRect()
return bottom >= 0 && top < window.innerHeight
}
function percentOfdomInScreen(dom) {
const { height, bottom } = dom.getBoundingClientRect()
if (bottom <= 0) return 0
if (bottom >= height) return 1
return bottom / height
}
function canNodeCalculate(node) {
return (
node.innerHTML
&& node.innerHTML !== '<br>'
&& !node.textContent.startsWith('```')
&& isInScreen(node)
&& percentOfdomInScreen(node) >= 0
)
}
const editor = $('#editor')
const showDom = $('#show-content')
const markdown = new MarkdownParser()
showDom.innerHTML = markdown.compile(editor.children)
function onInput() {
let index = 0
const data = Array.from(editor.children)
data.forEach(item => {
delete item.dataset.index
if (item.tagName !== 'BR' && item.innerText.trim() !== '') {
if (!item.children.length || (item.children.length === 1 && item.children[0].tagName === 'BR')) {
item.dataset.index = index++
return
}
const frag = document.createDocumentFragment()
Array.from(item.childNodes).forEach(e => {
if (e.nodeType === Node.TEXT_NODE) {
const div = document.createElement('div')
div.textContent = e.nodeValue
item.replaceChild(div, e)
div.dataset.index = index++
frag.appendChild(div)
} else if (item.tagName !== 'BR') {
e.dataset?.index && delete e.dataset.index
e.dataset.index = index++
frag.appendChild(e)
}
})
editor.replaceChild(frag, item)
changeCursorPosition(editor.querySelector(`[data-index="${index - 1}"]`))
}
})
showDom.innerHTML = markdown.compile(editor.childNodes)
}
const debounceFn = debounce(100)
editor.oninput = () => {
debounceFn(onInput)
}
editor.onpaste = (e) => {
clearTextStyle(e)
}
const canScroll = {
editor: true,
showDom: true,
}
const debounceFn2 = debounce(100)
const throttleFn = throttle(50)
editor.onscroll = () => {
if (!canScroll.editor) return
canScroll.showDom = false
throttleFn(onScroll, editor, showDom)
debounceFn2(resumeScroll)
}
showDom.onscroll = () => {
if (!canScroll.showDom) return
canScroll.editor = false
throttleFn(onScroll, showDom, editor)
debounceFn(resumeScroll)
}
function resumeScroll() {
canScroll.editor = true
canScroll.showDom = true
}
function onScroll(scrollContainer, ShowContainer) {
const scrollHeight = ShowContainer.scrollHeight
if (scrollContainer.offsetHeight + scrollContainer.scrollTop >= scrollContainer.scrollHeight) {
ShowContainer.scrollTo({ top: scrollHeight - ShowContainer.clientHeight })
return
}
if (scrollContainer.scrollTop === 0) {
ShowContainer.scrollTo({ top: 0 })
return
}
const nodes = Array.from(scrollContainer.children)
for (const node of nodes) {
if (canNodeCalculate(node)) {
if (node.tagName === 'PRE' || node.tagName === 'TABLE') {
if (hasPreElementInScrollContainerScroll(node, ShowContainer)) return
continue
}
const index = node.dataset.index
const dom = ShowContainer.querySelector(`[data-index="${index}"]`)
if (!dom) continue
const percent = percentOfdomInScreen(node)
const heightToTop = getHeightToTop(dom)
const domNeedHideHeight = dom.offsetHeight * (1 - percent)
ShowContainer.scrollTo({ top: heightToTop + domNeedHideHeight })
break
}
}
}
function hasPreElementInScrollContainerScroll(preElement, ShowContainer) {
for (const node of preElement.children[0].children) {
if (isInScreen(node) && percentOfdomInScreen(node) >= 0) {
const index = node.dataset.index
const dom = ShowContainer.querySelector(`[data-index="${index}"]`)
if (!dom) continue
const percent = percentOfdomInScreen(node)
const heightToTop = getHeightToTop(dom)
const domNeedHideHeight = dom.offsetHeight * (1 - percent)
ShowContainer.scrollTo({ top: heightToTop + domNeedHideHeight })
return true
}
}
return false
}
<!DOCTYPE html>
<html>
<head>
<meta charset="utf-8">
<title>markdown 编辑器双屏同步滚动 demo3</title>
<link rel="stylesheet" href="index.css">
</head>
<body>
<div id="editor" contenteditable class="text-container">
<div data-index="0">本文主要对以下技术要点进行分析:</div><div data-index="1">1. 编辑器</div><div data-index="2">2. 自定义组件</div><div data-index="3">3. 拖拽</div><div data-index="4">4. 删除组件、调整图层层级</div><div data-index="5">5. 放大缩小</div><div data-index="6">6. 撤消、重做</div><div data-index="7">7. 组件属性设置</div><div data-index="8">8. 吸附</div><div data-index="9">9. 预览、保存代码</div><div data-index="10">10. 绑定事件</div><div data-index="11">11. 绑定动画</div><div data-index="12">12. 导入 PSD</div><div data-index="13">13. 手机模式</div><div><br></div><div data-index="14">为了让本文更加容易理解,我将以上技术要点结合在一起写了一个可视化拖拽组件库 DEMO:</div><div data-index="15">* [github 项目地址](https://github.com/woai3c/visual-drag-demo)</div><div data-index="16">* [在线预览](https://woai3c.github.io/visual-drag-demo)</div><div><br></div><div data-index="17">建议结合源码一起阅读,效果更好(这个 DEMO 使用的是 Vue 技术栈)。</div><div><br></div><div data-index="18">## 1. 编辑器</div><div data-index="19">先来看一下页面的整体结构。</div><div><br></div><div data-index="20">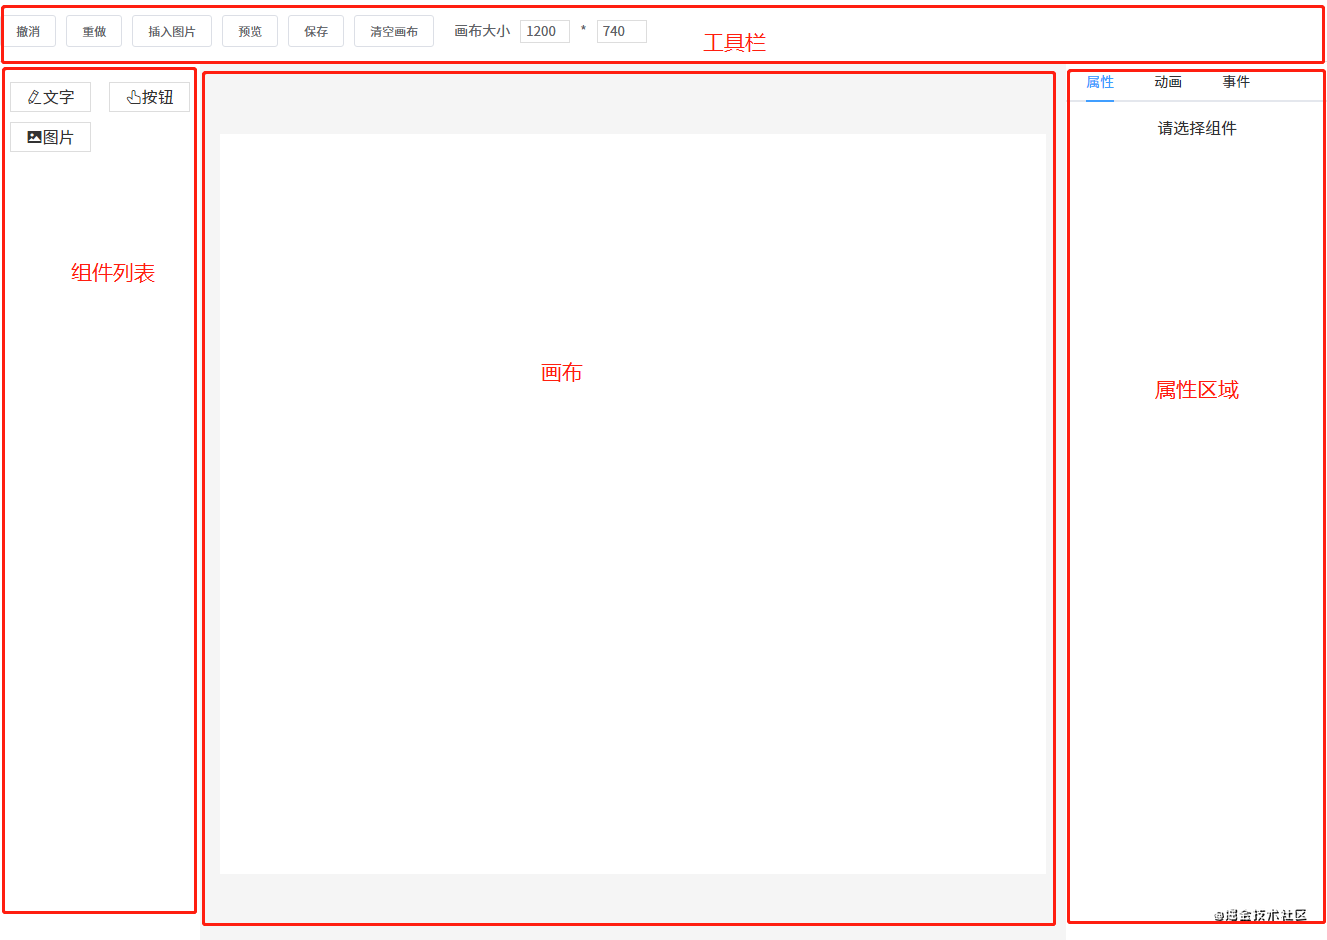</div><div><br></div><div data-index="21">这一节要讲的编辑器其实就是中间的画布。它的作用是:当从左边组件列表拖拽出一个组件放到画布中时,画布要把这个组件渲染出来。</div><div><br></div><div data-index="22">这个编辑器的实现思路是:</div><div data-index="23">1. 用一个数组 `componentData` 维护编辑器中的数据。</div><div data-index="24">2. 把组件拖拽到画布中时,使用 `push()` 方法将新的组件数据添加到 `componentData`。</div><div data-index="25">3. 编辑器使用 `v-for` 指令遍历 `componentData`,将每个组件逐个渲染到画布(也可以使用 JSX 语法结合 `render()` 方法代替)。</div><div><br></div><div data-index="26">编辑器渲染的核心代码如下所示:</div><div data-index="27">```js</div><div data-index="28"><component </div><div data-index="29"> v-for="item in componentData"</div><div data-index="30"> :key="item.id"</div><div data-index="31"> :is="item.component"</div><div data-index="32"> :style="item.style"</div><div data-index="33"> :propValue="item.propValue"</div><div data-index="34">/></div><div data-index="35">```</div><div data-index="36">每个组件数据大概是这样:</div><div data-index="37">```js</div><div data-index="38">{</div><div data-index="39"> component: 'v-text', // 组件名称,需要提前注册到 Vue</div><div data-index="40"> label: '文字', // 左侧组件列表中显示的名字</div><div data-index="41"> propValue: '文字', // 组件所使用的值</div><div data-index="42"> icon: 'el-icon-edit', // 左侧组件列表中显示的名字</div><div data-index="43"> animations: [], // 动画列表</div><div data-index="44"> events: {}, // 事件列表</div><div data-index="45"> style: { // 组件样式</div><div data-index="46"> width: 200,</div><div data-index="47"> height: 33,</div><div data-index="48"> fontSize: 14,</div><div data-index="49"> fontWeight: 500,</div><div data-index="50"> lineHeight: '',</div><div data-index="51"> letterSpacing: 0,</div><div data-index="52"> textAlign: '',</div><div data-index="53"> color: '',</div><div data-index="54"> },</div><div data-index="55">}</div><div data-index="56">```</div><div data-index="57">在遍历 `componentData` 组件数据时,主要靠 `is` 属性来识别出真正要渲染的是哪个组件。</div><div><br></div><div data-index="58">例如要渲染的组件数据是 `{ component: 'v-text' }`,则 `<component :is="item.component" />` 会被转换为 `<v-text />`。当然,你这个组件也要提前注册到 Vue 中。</div><div><br></div><div data-index="59">如果你想了解更多 `is` 属性的资料,请查看[官方文档](https://cn.vuejs.org/v2/api/#is)。</div><div><br></div><div data-index="60">## 2. 自定义组件</div><div data-index="61">原则上使用第三方组件也是可以的,但建议你最好封装一下。不管是第三方组件还是自定义组件,每个组件所需的属性可能都不一样,所以每个组件数据可以暴露出一个属性 `propValue` 用于传递值。</div><div><br></div><div data-index="62">例如 a 组件只需要一个属性,你的 `propValue` 可以这样写:`propValue: 'aaa'`。如果需要多个属性,`propValue` 则可以是一个对象:</div><div data-index="63">```js</div><div data-index="64">propValue: {</div><div data-index="65"> a: 1,</div><div data-index="66"> b: 'text'</div><div data-index="67">}</div><div data-index="68">```</div><div><br></div><div data-index="69">在这个 DEMO 组件库中我定义了三个组件。</div><div><br></div><div data-index="70">图片组件 `Picture`:</div><div data-index="71">```html</div><div data-index="72"><template></div><div data-index="73"> <div style="overflow: hidden"></div><div data-index="74"> <img :src="propValue"></div><div data-index="75"> </div></div><div data-index="76"></template></div><div><br></div><div data-index="77"><script></div><div data-index="78">export default {</div><div data-index="79"> props: {</div><div data-index="80"> propValue: {</div><div data-index="81"> type: String,</div><div data-index="82"> require: true,</div><div data-index="83"> },</div><div data-index="84"> },</div><div data-index="85">}</div><div data-index="86"></script></div><div data-index="87">```</div><div data-index="88">按钮组件 `VButton`:</div><div data-index="89">```html</div><div data-index="90"><template></div><div data-index="91"> <button class="v-button">{{ propValue }}</button></div><div data-index="92"></template></div><div><br></div><div data-index="93"><script></div><div data-index="94">export default {</div><div data-index="95"> props: {</div><div data-index="96"> propValue: {</div><div data-index="97"> type: String,</div><div data-index="98"> default: '',</div><div data-index="99"> },</div><div data-index="100"> },</div><div data-index="101">}</div><div data-index="102"></script></div><div data-index="103">```</div><div data-index="104">文本组件 `VText`:</div><div data-index="105">```js</div><div data-index="106"><template></div><div data-index="107"> <textarea </div><div data-index="108"> v-if="editMode == 'edit'"</div><div data-index="109"> :value="propValue"</div><div data-index="110"> class="text textarea"</div><div data-index="111"> @input="handleInput"</div><div data-index="112"> ref="v-text"</div><div data-index="113"> ></textarea></div><div data-index="114"> <div v-else class="text disabled"></div><div data-index="115"> <div v-for="(text, index) in propValue.split('\n')" :key="index">{{ text }}</div></div><div data-index="116"> </div></div><div data-index="117"></template></div><div><br></div><div data-index="118"><script></div><div data-index="119">import { mapState } from 'vuex'</div><div><br></div><div data-index="120">export default {</div><div data-index="121"> props: {</div><div data-index="122"> propValue: {</div><div data-index="123"> type: String,</div><div data-index="124"> },</div><div data-index="125"> element: {</div><div data-index="126"> type: Object,</div><div data-index="127"> },</div><div data-index="128"> },</div><div data-index="129"> computed: mapState([</div><div data-index="130"> 'editMode',</div><div data-index="131"> ]),</div><div data-index="132"> methods: {</div><div data-index="133"> handleInput(e) {</div><div data-index="134"> this.$emit('input', this.element, e.target.value)</div><div data-index="135"> },</div><div data-index="136"> },</div><div data-index="137">}</div><div data-index="138"></script></div><div data-index="139">```</div><div data-index="140">## 3. 拖拽</div><div data-index="141">### 从组件列表到画布</div><div data-index="142">一个元素如果要设为可拖拽,必须给它添加一个 `draggable` 属性。另外,在将组件列表中的组件拖拽到画布中,还有两个事件是起到关键作用的:</div><div data-index="143">1. `dragstart` 事件,在拖拽刚开始时触发。它主要用于将拖拽的组件信息传递给画布。</div><div data-index="144">2. `drop` 事件,在拖拽结束时触发。主要用于接收拖拽的组件信息。</div><div><br></div><div data-index="145">先来看一下左侧组件列表的代码:</div><div data-index="146">```html</div><div data-index="147"><div @dragstart="handleDragStart" class="component-list"></div><div data-index="148"> <div v-for="(item, index) in componentList" :key="index" class="list" draggable :data-index="index"></div><div data-index="149"> <i :class="item.icon"></i></div><div data-index="150"> <span>{{ item.label }}</span></div><div data-index="151"> </div></div><div data-index="152"></div></div><div data-index="153">```</div><div data-index="154">```js</div><div data-index="155">handleDragStart(e) {</div><div data-index="156"> e.dataTransfer.setData('index', e.target.dataset.index)</div><div data-index="157">}</div><div data-index="158">```</div><div data-index="159">可以看到给列表中的每一个组件都设置了 `draggable` 属性。另外,在触发 `dragstart` 事件时,使用 `dataTransfer.setData()` 传输数据。再来看一下接收数据的代码:</div><div data-index="160">```html</div><div data-index="161"><div class="content" @drop="handleDrop" @dragover="handleDragOver" @click="deselectCurComponent"></div><div data-index="162"> <Editor /></div><div data-index="163"></div></div><div data-index="164">```</div><div data-index="165">```js</div><div data-index="166">handleDrop(e) {</div><div data-index="167"> e.preventDefault()</div><div data-index="168"> e.stopPropagation()</div><div data-index="169"> const component = deepCopy(componentList[e.dataTransfer.getData('index')])</div><div data-index="170"> this.$store.commit('addComponent', component)</div><div data-index="171">}</div><div data-index="172">```</div><div data-index="173">触发 `drop` 事件时,使用 `dataTransfer.getData()` 接收传输过来的索引数据,然后根据索引找到对应的组件数据,再添加到画布,从而渲染组件。</div><div><br></div><div data-index="174"></div><div><br></div><div data-index="175">### 组件在画布中移动</div><div data-index="176">首先需要将画布设为相对定位 `position: relative`,然后将每个组件设为绝对定位 `position: absolute`。除了这一点外,还要通过监听三个事件来进行移动:</div><div data-index="177">1. `mousedown` 事件,在组件上按下鼠标时,记录组件当前的位置,即 xy 坐标(为了方便讲解,这里使用的坐标轴,实际上 xy 对应的是 css 中的 `left` 和 `top`。</div><div data-index="178">2. `mousemove` 事件,每次鼠标移动时,都用当前最新的 xy 坐标减去最开始的 xy 坐标,从而计算出移动距离,再改变组件位置。</div><div data-index="179">3. `mouseup` 事件,鼠标抬起时结束移动。</div><div><br></div><div data-index="180">```js</div><div data-index="181">handleMouseDown(e) {</div><div data-index="182"> e.stopPropagation()</div><div data-index="183"> this.$store.commit('setCurComponent', { component: this.element, zIndex: this.zIndex })</div><div><br></div><div data-index="184"> const pos = { ...this.defaultStyle }</div><div data-index="185"> const startY = e.clientY</div><div data-index="186"> const startX = e.clientX</div><div data-index="187"> // 如果直接修改属性,值的类型会变为字符串,所以要转为数值型</div><div data-index="188"> const startTop = Number(pos.top)</div><div data-index="189"> const startLeft = Number(pos.left)</div><div><br></div><div data-index="190"> const move = (moveEvent) => {</div><div data-index="191"> const currX = moveEvent.clientX</div><div data-index="192"> const currY = moveEvent.clientY</div><div data-index="193"> pos.top = currY - startY + startTop</div><div data-index="194"> pos.left = currX - startX + startLeft</div><div data-index="195"> // 修改当前组件样式</div><div data-index="196"> this.$store.commit('setShapeStyle', pos)</div><div data-index="197"> }</div><div><br></div><div data-index="198"> const up = () => {</div><div data-index="199"> document.removeEventListener('mousemove', move)</div><div data-index="200"> document.removeEventListener('mouseup', up)</div><div data-index="201"> }</div><div><br></div><div data-index="202"> document.addEventListener('mousemove', move)</div><div data-index="203"> document.addEventListener('mouseup', up)</div><div data-index="204">}</div><div data-index="205">```</div><div><br></div><div data-index="206"></div><div data-index="207">**PS**: 有很多网友反馈拖拽的时候有卡顿现象,其实解决方案很简单,把浏览器的控制台关掉即可。</div><div data-index="208">## 4. 删除组件、调整图层层级</div><div data-index="209">### 改变图层层级</div><div data-index="210">由于拖拽组件到画布中是有先后顺序的,所以可以按照数据顺序来分配图层层级。</div><div><br></div><div data-index="211">例如画布新增了五个组件 abcde,那它们在画布数据中的顺序为 `[a, b, c, d, e]`,图层层级和索引一一对应,即它们的 `z-index` 属性值是 01234(后来居上)。用代码表示如下:</div><div data-index="212">```html</div><div data-index="213"><div v-for="(item, index) in componentData" :zIndex="index"></div></div><div data-index="214">```</div><div data-index="215">如果不了解 `z-index` 属性的,请看一下 [MDN 文档](https://developer.mozilla.org/zh-CN/docs/Web/CSS/z-index)。</div><div><br></div><div data-index="216">理解了这一点之后,改变图层层级就很容易做到了。改变图层层级,即是改变组件数据在 `componentData` 数组中的顺序。例如有 `[a, b, c]` 三个组件,它们的图层层级从低到高顺序为 abc(索引越大,层级越高)。</div><div><br></div><div data-index="217">如果要将 b 组件上移,只需将它和 c 调换顺序即可:</div><div data-index="218">```js</div><div data-index="219">const temp = componentData[1]</div><div data-index="220">componentData[1] = componentData[2]</div><div data-index="221">componentData[2] = temp</div><div data-index="222">```</div><div data-index="223">同理,置顶置底也是一样,例如我要将 a 组件置顶,只需将 a 和最后一个组件调换顺序即可:</div><div data-index="224">```js</div><div data-index="225">const temp = componentData[0]</div><div data-index="226">componentData[0] = componentData[componentData.lenght - 1]</div><div data-index="227">componentData[componentData.lenght - 1] = temp</div><div data-index="228">```</div><div><br></div><div data-index="229"></div><div><br></div><div data-index="230">### 删除组件</div><div data-index="231">删除组件非常简单,一行代码搞定:`componentData.splice(index, 1)`。</div><div><br></div><div data-index="232"></div><div data-index="233">## 5. 放大缩小</div><div data-index="234">细心的网友可能会发现,点击画布上的组件时,组件上会出现 8 个小圆点。这 8 个小圆点就是用来放大缩小用的。实现原理如下:</div><div data-index="235">#### 1. 在每个组件外面包一层 `Shape` 组件,`Shape` 组件里包含 8 个小圆点和一个 `<slot>` 插槽,用于放置组件。</div><div data-index="236">```html</div><div data-index="237"><!--页面组件列表展示--></div><div data-index="238"><Shape v-for="(item, index) in componentData"</div><div data-index="239"> :defaultStyle="item.style"</div><div data-index="240"> :style="getShapeStyle(item.style, index)"</div><div data-index="241"> :key="item.id"</div><div data-index="242"> :active="item === curComponent"</div><div data-index="243"> :element="item"</div><div data-index="244"> :zIndex="index"</div><div data-index="245">></div><div data-index="246"> <component</div><div data-index="247"> class="component"</div><div data-index="248"> :is="item.component"</div><div data-index="249"> :style="getComponentStyle(item.style)"</div><div data-index="250"> :propValue="item.propValue"</div><div data-index="251"> /></div><div data-index="252"></Shape></div><div data-index="253">```</div><div data-index="254">`Shape` 组件内部结构:</div><div data-index="255">```html</div><div data-index="256"><template></div><div data-index="257"> <div class="shape" :class="{ active: this.active }" @click="selectCurComponent" @mousedown="handleMouseDown"</div><div data-index="258"> @contextmenu="handleContextMenu"></div><div data-index="259"> <div</div><div data-index="260"> class="shape-point"</div><div data-index="261"> v-for="(item, index) in (active? pointList : [])"</div><div data-index="262"> @mousedown="handleMouseDownOnPoint(item)"</div><div data-index="263"> :key="index"</div><div data-index="264"> :style="getPointStyle(item)"></div><div data-index="265"> </div></div><div data-index="266"> <slot></slot></div><div data-index="267"> </div></div><div data-index="268"></template></div><div data-index="269">```</div><div data-index="270">#### 2. 点击组件时,将 8 个小圆点显示出来。</div><div data-index="271">起作用的是这行代码 `:active="item === curComponent"`。</div><div><br></div><div data-index="272">#### 3. 计算每个小圆点的位置。</div><div data-index="273">先来看一下计算小圆点位置的代码:</div><div data-index="274">```js</div><div data-index="275">const pointList = ['t', 'r', 'b', 'l', 'lt', 'rt', 'lb', 'rb']</div><div><br></div><div data-index="276">getPointStyle(point) {</div><div data-index="277"> const { width, height } = this.defaultStyle</div><div data-index="278"> const hasT = /t/.test(point)</div><div data-index="279"> const hasB = /b/.test(point)</div><div data-index="280"> const hasL = /l/.test(point)</div><div data-index="281"> const hasR = /r/.test(point)</div><div data-index="282"> let newLeft = 0</div><div data-index="283"> let newTop = 0</div><div><br></div><div data-index="284"> // 四个角的点</div><div data-index="285"> if (point.length === 2) {</div><div data-index="286"> newLeft = hasL? 0 : width</div><div data-index="287"> newTop = hasT? 0 : height</div><div data-index="288"> } else {</div><div data-index="289"> // 上下两点的点,宽度居中</div><div data-index="290"> if (hasT || hasB) {</div><div data-index="291"> newLeft = width / 2</div><div data-index="292"> newTop = hasT? 0 : height</div><div data-index="293"> }</div><div><br></div><div data-index="294"> // 左右两边的点,高度居中</div><div data-index="295"> if (hasL || hasR) {</div><div data-index="296"> newLeft = hasL? 0 : width</div><div data-index="297"> newTop = Math.floor(height / 2)</div><div data-index="298"> }</div><div data-index="299"> }</div><div><br></div><div data-index="300"> const style = {</div><div data-index="301"> marginLeft: hasR? '-4px' : '-3px',</div><div data-index="302"> marginTop: '-3px',</div><div data-index="303"> left: `${newLeft}px`,</div><div data-index="304"> top: `${newTop}px`,</div><div data-index="305"> cursor: point.split('').reverse().map(m => this.directionKey[m]).join('') + '-resize',</div><div data-index="306"> }</div><div><br></div><div data-index="307"> return style</div><div data-index="308">}</div><div data-index="309">```</div><div><br></div><div data-index="310">计算小圆点的位置需要获取一些信息:</div><div data-index="311">* 组件的高度 `height`、宽度 `width`</div><div><br></div><div data-index="312">注意,小圆点也是绝对定位的,相对于 `Shape` 组件。所以有四个小圆点的位置很好确定:</div><div data-index="313">1. 左上角的小圆点,坐标 `left: 0, top: 0`</div><div data-index="314">2. 右上角的小圆点,坐标 `left: width, top: 0`</div><div data-index="315">3. 左下角的小圆点,坐标 `left: 0, top: height`</div><div data-index="316">4. 右下角的小圆点,坐标 `left: width, top: height`</div><div><br></div><div data-index="317">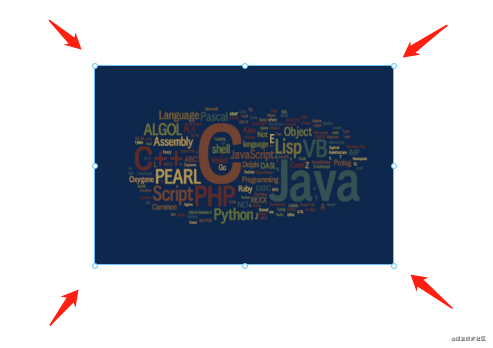</div><div><br></div><div data-index="318">另外的四个小圆点需要通过计算间接算出来。例如左边中间的小圆点,计算公式为 `left: 0, top: height / 2`,其他小圆点同理。</div><div><br></div><div data-index="319">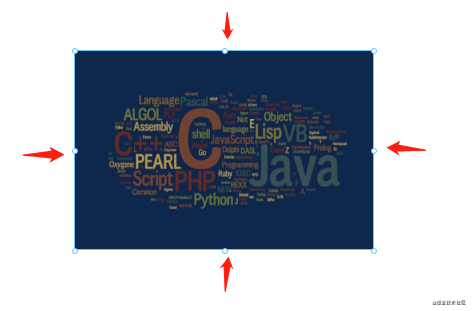</div><div><br></div><div data-index="320">#### 4. 点击小圆点时,可以进行放大缩小操作。</div><div data-index="321">```js</div><div data-index="322">handleMouseDownOnPoint(point) {</div><div data-index="323"> const downEvent = window.event</div><div data-index="324"> downEvent.stopPropagation()</div><div data-index="325"> downEvent.preventDefault()</div><div><br></div><div data-index="326"> const pos = { ...this.defaultStyle }</div><div data-index="327"> const height = Number(pos.height)</div><div data-index="328"> const width = Number(pos.width)</div><div data-index="329"> const top = Number(pos.top)</div><div data-index="330"> const left = Number(pos.left)</div><div data-index="331"> const startX = downEvent.clientX</div><div data-index="332"> const startY = downEvent.clientY</div><div><br></div><div data-index="333"> // 是否需要保存快照</div><div data-index="334"> let needSave = false</div><div data-index="335"> const move = (moveEvent) => {</div><div data-index="336"> needSave = true</div><div data-index="337"> const currX = moveEvent.clientX</div><div data-index="338"> const currY = moveEvent.clientY</div><div data-index="339"> const disY = currY - startY</div><div data-index="340"> const disX = currX - startX</div><div data-index="341"> const hasT = /t/.test(point)</div><div data-index="342"> const hasB = /b/.test(point)</div><div data-index="343"> const hasL = /l/.test(point)</div><div data-index="344"> const hasR = /r/.test(point)</div><div data-index="345"> const newHeight = height + (hasT? -disY : hasB? disY : 0)</div><div data-index="346"> const newWidth = width + (hasL? -disX : hasR? disX : 0)</div><div data-index="347"> pos.height = newHeight > 0? newHeight : 0</div><div data-index="348"> pos.width = newWidth > 0? newWidth : 0</div><div data-index="349"> pos.left = left + (hasL? disX : 0)</div><div data-index="350"> pos.top = top + (hasT? disY : 0)</div><div data-index="351"> this.$store.commit('setShapeStyle', pos)</div><div data-index="352"> }</div><div><br></div><div data-index="353"> const up = () => {</div><div data-index="354"> document.removeEventListener('mousemove', move)</div><div data-index="355"> document.removeEventListener('mouseup', up)</div><div data-index="356"> needSave && this.$store.commit('recordSnapshot')</div><div data-index="357"> }</div><div><br></div><div data-index="358"> document.addEventListener('mousemove', move)</div><div data-index="359"> document.addEventListener('mouseup', up)</div><div data-index="360">}</div><div data-index="361">```</div><div data-index="362">它的原理是这样的:</div><div data-index="363">1. 点击小圆点时,记录点击的坐标 xy。</div><div data-index="364">2. 假设我们现在向下拖动,那么 y 坐标就会增大。</div><div data-index="365">3. 用新的 y 坐标减去原来的 y 坐标,就可以知道在纵轴方向的移动距离是多少。</div><div data-index="366">4. 最后再将移动距离加上原来组件的高度,就可以得出新的组件高度。</div><div data-index="367">5. 如果是正数,说明是往下拉,组件的高度在增加。如果是负数,说明是往上拉,组件的高度在减少。</div><div><br></div><div data-index="368"></div><div data-index="369">## 6. 撤消、重做</div><div data-index="370">撤销重做的实现原理其实挺简单的,先看一下代码:</div><div data-index="371">```js</div><div data-index="372">snapshotData: [], // 编辑器快照数据</div><div data-index="373">snapshotIndex: -1, // 快照索引</div><div> </div><div data-index="374">undo(state) {</div><div data-index="375"> if (state.snapshotIndex >= 0) {</div><div data-index="376"> state.snapshotIndex--</div><div data-index="377"> store.commit('setComponentData', deepCopy(state.snapshotData[state.snapshotIndex]))</div><div data-index="378"> }</div><div data-index="379">},</div><div><br></div><div data-index="380">redo(state) {</div><div data-index="381"> if (state.snapshotIndex < state.snapshotData.length - 1) {</div><div data-index="382"> state.snapshotIndex++</div><div data-index="383"> store.commit('setComponentData', deepCopy(state.snapshotData[state.snapshotIndex]))</div><div data-index="384"> }</div><div data-index="385">},</div><div><br></div><div data-index="386">setComponentData(state, componentData = []) {</div><div data-index="387"> Vue.set(state, 'componentData', componentData)</div><div data-index="388">},</div><div><br></div><div data-index="389">recordSnapshot(state) {</div><div data-index="390"> // 添加新的快照</div><div data-index="391"> state.snapshotData[++state.snapshotIndex] = deepCopy(state.componentData)</div><div data-index="392"> // 在 undo 过程中,添加新的快照时,要将它后面的快照清理掉</div><div data-index="393"> if (state.snapshotIndex < state.snapshotData.length - 1) {</div><div data-index="394"> state.snapshotData = state.snapshotData.slice(0, state.snapshotIndex + 1)</div><div data-index="395"> }</div><div data-index="396">},</div><div data-index="397">```</div><div data-index="398">用一个数组来保存编辑器的快照数据。保存快照就是不停地执行 `push()` 操作,将当前的编辑器数据推入 `snapshotData` 数组,并增加快照索引 `snapshotIndex`。目前以下几个动作会触发保存快照操作:</div><div data-index="399">* 新增组件</div><div data-index="400">* 删除组件</div><div data-index="401">* 改变图层层级</div><div data-index="402">* 拖动组件结束时</div><div data-index="403">...</div><div><br></div><div data-index="404">#### 撤销</div><div data-index="405">假设现在 `snapshotData` 保存了 4 个快照。即 `[a, b, c, d]`,对应的快照索引为 3。如果这时进行了撤销操作,我们需要将快照索引减 1,然后将对应的快照数据赋值给画布。</div><div><br></div><div data-index="406">例如当前画布数据是 d,进行撤销后,索引 -1,现在画布的数据是 c。</div><div><br></div><div data-index="407">#### 重做</div><div data-index="408">明白了撤销,那重做就很好理解了,就是将快照索引加 1,然后将对应的快照数据赋值给画布。</div><div><br></div><div data-index="409">不过还有一点要注意,就是在撤销操作中进行了新的操作,要怎么办呢?有两种解决方案:</div><div data-index="410">1. 新操作替换当前快照索引后面所有的数据。还是用刚才的数据 `[a, b, c, d]` 举例,假设现在进行了两次撤销操作,快照索引变为 1,对应的快照数据为 b,如果这时进行了新的操作,对应的快照数据为 e。那 e 会把 cd 顶掉,现在的快照数据为 `[a, b, e]`。</div><div data-index="411">2. 不顶掉数据,在原来的快照中新增一条记录。用刚才的例子举例,e 不会把 cd 顶掉,而是在 cd 之前插入,即快照数据变为 `[a, b, e, c, d]`。</div><div><br></div><div data-index="412">我采用的是第一种方案。</div><div><br></div><div data-index="413"></div><div><br></div><div data-index="414">## 7. 吸附</div><div data-index="415">什么是吸附?就是在拖拽组件时,如果它和另一个组件的距离比较接近,就会自动吸附在一起。</div><div><br></div><div data-index="416"></div><div><br></div><div data-index="417">吸附的代码大概在 300 行左右,建议自己打开源码文件看(文件路径:`src\components\Editor\MarkLine.vue`)。这里不贴代码了,主要说说原理是怎么实现的。</div><div><br></div><div data-index="418">### 标线</div><div data-index="419">在页面上创建 6 条线,分别是三横三竖。这 6 条线的作用是对齐,它们什么时候会出现呢?</div><div data-index="420">1. 上下方向的两个组件左边、中间、右边对齐时会出现竖线</div><div data-index="421">2. 左右方向的两个组件上边、中间、下边对齐时会出现横线</div><div><br></div><div data-index="422">具体的计算公式主要是根据每个组件的 xy 坐标和宽度高度进行计算的。例如要判断 ab 两个组件的左边是否对齐,则要知道它们每个组件的 x 坐标;如果要知道它们右边是否对齐,除了要知道 x 坐标,还要知道它们各自的宽度。</div><div data-index="423">```js</div><div data-index="424">// 左对齐的条件</div><div data-index="425">a.x == b.x</div><div><br></div><div data-index="426">// 右对齐的条件</div><div data-index="427">a.x + a.width == b.x + b.width</div><div data-index="428">```</div><div data-index="429">在对齐的时候,显示标线。</div><div><br></div><div data-index="430">另外还要判断 ab 两个组件是否“足够”近。如果足够近,就吸附在一起。是否足够近要靠一个变量来判断:</div><div data-index="431">```js</div><div data-index="432">diff: 3, // 相距 dff 像素将自动吸附</div><div data-index="433">```</div><div data-index="434">小于等于 `diff` 像素则自动吸附。</div><div><br></div><div data-index="435">### 吸附</div><div data-index="436">**吸附效果是怎么实现的呢?**</div><div><br></div><div data-index="437">假设现在有 ab 组件,a 组件坐标 xy 都是 0,宽高都是 100。现在假设 a 组件不动,我们正在拖拽 b 组件。当把 b 组件拖到坐标为 `x: 0, y: 103` 时,由于 `103 - 100 <= 3(diff)`,所以可以判定它们已经接近得足够近。这时需要手动将 b 组件的 y 坐标值设为 100,这样就将 ab 组件吸附在一起了。</div><div><br></div><div data-index="438"></div><div><br></div><div data-index="439">### 优化</div><div data-index="440">在拖拽时如果 6 条标线都显示出来会不太美观。所以我们可以做一下优化,在纵横方向上最多只同时显示一条线。实现原理如下:</div><div data-index="441">1. a 组件在左边不动,我们拖着 b 组件往 a 组件靠近。</div><div data-index="442">2. 这时它们最先对齐的是 a 的右边和 b 的左边,所以只需要一条线就够了。</div><div data-index="443">3. 如果 ab 组件已经靠近,并且 b 组件继续往左边移动,这时就要判断它们俩的中间是否对齐。</div><div data-index="444">4. b 组件继续拖动,这时需要判断 a 组件的左边和 b 组件的右边是否对齐,也是只需要一条线。</div><div><br></div><div data-index="445">可以发现,关键的地方是我们要知道两个组件的方向。即 ab 两个组件靠近,我们要知道到底 b 是在 a 的左边还是右边。</div><div><br></div><div data-index="446">这一点可以通过鼠标移动事件来判断,之前在讲解拖拽的时候说过,`mousedown` 事件触发时会记录起点坐标。所以每次触发 `mousemove` 事件时,用当前坐标减去原来的坐标,就可以判断组件方向。例如 x 方向上,如果 `b.x - a.x` 的差值为正,说明是 b 在 a 右边,否则为左边。</div><div><br></div><div data-index="447">```js</div><div data-index="448">// 触发元素移动事件,用于显示标线、吸附功能</div><div data-index="449">// 后面两个参数代表鼠标移动方向</div><div data-index="450">// currY - startY > 0 true 表示向下移动 false 表示向上移动</div><div data-index="451">// currX - startX > 0 true 表示向右移动 false 表示向左移动</div><div data-index="452">eventBus.$emit('move', this.$el, currY - startY > 0, currX - startX > 0)</div><div data-index="453">```</div><div><br></div><div data-index="454"></div><div data-index="455">## 8. 组件属性设置</div><div data-index="456">每个组件都有一些通用属性和独有的属性,我们需要提供一个能显示和修改属性的地方。</div><div data-index="457">```js</div><div data-index="458">// 每个组件数据大概是这样</div><div data-index="459">{</div><div data-index="460"> component: 'v-text', // 组件名称,需要提前注册到 Vue</div><div data-index="461"> label: '文字', // 左侧组件列表中显示的名字</div><div data-index="462"> propValue: '文字', // 组件所使用的值</div><div data-index="463"> icon: 'el-icon-edit', // 左侧组件列表中显示的名字</div><div data-index="464"> animations: [], // 动画列表</div><div data-index="465"> events: {}, // 事件列表</div><div data-index="466"> style: { // 组件样式</div><div data-index="467"> width: 200,</div><div data-index="468"> height: 33,</div><div data-index="469"> fontSize: 14,</div><div data-index="470"> fontWeight: 500,</div><div data-index="471"> lineHeight: '',</div><div data-index="472"> letterSpacing: 0,</div><div data-index="473"> textAlign: '',</div><div data-index="474"> color: '',</div><div data-index="475"> },</div><div data-index="476">}</div><div data-index="477">```</div><div><br></div><div data-index="478">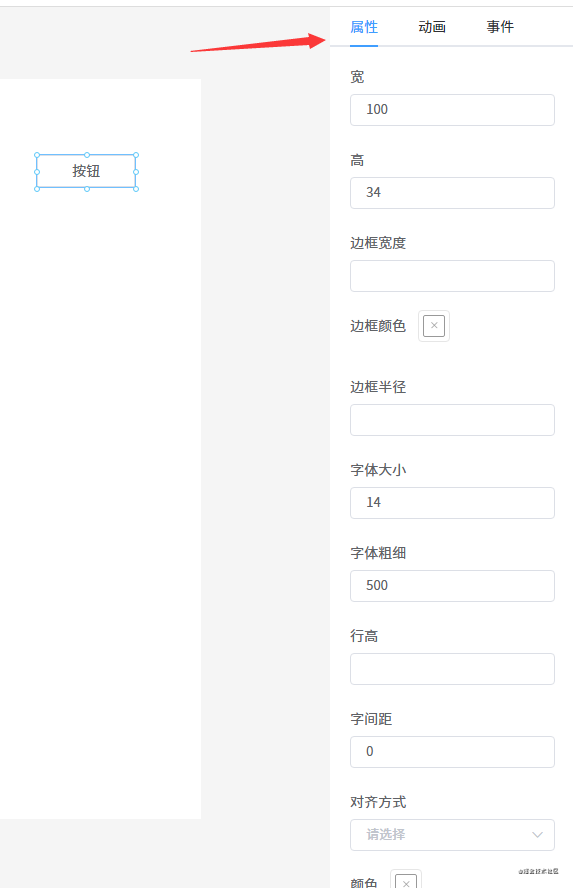</div><div><br></div><div data-index="479">我定义了一个 `AttrList` 组件,用于显示每个组件的属性。</div><div data-index="480">```html</div><div data-index="481"><template></div><div data-index="482"> <div class="attr-list"></div><div data-index="483"> <el-form></div><div data-index="484"> <el-form-item v-for="(key, index) in styleKeys" :key="index" :label="map[key]"></div><div data-index="485"> <el-color-picker v-if="key == 'borderColor'" v-model="curComponent.style[key]"></el-color-picker></div><div data-index="486"> <el-color-picker v-else-if="key == 'color'" v-model="curComponent.style[key]"></el-color-picker></div><div data-index="487"> <el-color-picker v-else-if="key == 'backgroundColor'" v-model="curComponent.style[key]"></el-color-picker></div><div data-index="488"> <el-select v-else-if="key == 'textAlign'" v-model="curComponent.style[key]"></div><div data-index="489"> <el-option</div><div data-index="490"> v-for="item in options"</div><div data-index="491"> :key="item.value"</div><div data-index="492"> :label="item.label"</div><div data-index="493"> :value="item.value"</div><div data-index="494"> ></el-option></div><div data-index="495"> </el-select></div><div data-index="496"> <el-input type="number" v-else v-model="curComponent.style[key]" /></div><div data-index="497"> </el-form-item></div><div data-index="498"> <el-form-item label="内容" v-if="curComponent && curComponent.propValue && !excludes.includes(curComponent.component)"></div><div data-index="499"> <el-input type="textarea" v-model="curComponent.propValue" /></div><div data-index="500"> </el-form-item></div><div data-index="501"> </el-form></div><div data-index="502"> </div></div><div data-index="503"></template></div><div data-index="504">```</div><div data-index="505">代码逻辑很简单,就是遍历组件的 `style` 对象,将每一个属性遍历出来。并且需要根据具体的属性用不同的组件显示出来,例如颜色属性,需要用颜色选择器显示;数值类的属性需要用 `type=number` 的 input 组件显示等等。</div><div><br></div><div data-index="506">为了方便用户修改属性值,我使用 `v-model` 将组件和值绑定在一起。</div><div><br></div><div data-index="507"></div><div><br></div><div data-index="508">## 9. 预览、保存代码</div><div data-index="509">预览和编辑的渲染原理是一样的,区别是不需要编辑功能。所以只需要将原先渲染组件的代码稍微改一下就可以了。</div><div data-index="510">```html</div><div data-index="511"><!--页面组件列表展示--></div><div data-index="512"><Shape v-for="(item, index) in componentData"</div><div data-index="513"> :defaultStyle="item.style"</div><div data-index="514"> :style="getShapeStyle(item.style, index)"</div><div data-index="515"> :key="item.id"</div><div data-index="516"> :active="item === curComponent"</div><div data-index="517"> :element="item"</div><div data-index="518"> :zIndex="index"</div><div data-index="519">></div><div data-index="520"> <component</div><div data-index="521"> class="component"</div><div data-index="522"> :is="item.component"</div><div data-index="523"> :style="getComponentStyle(item.style)"</div><div data-index="524"> :propValue="item.propValue"</div><div data-index="525"> /></div><div data-index="526"></Shape></div><div data-index="527">```</div><div data-index="528">经过刚才的介绍,我们知道 `Shape` 组件具备了拖拽、放大缩小的功能。现在只需要将 `Shape` 组件去掉,外面改成套一个普通的 DIV 就可以了(其实不用这个 DIV 也行,但为了绑定事件这个功能,所以需要加上)。</div><div data-index="529">```html</div><div data-index="530"><!--页面组件列表展示--></div><div data-index="531"><div v-for="(item, index) in componentData" :key="item.id"></div><div data-index="532"> <component</div><div data-index="533"> class="component"</div><div data-index="534"> :is="item.component"</div><div data-index="535"> :style="getComponentStyle(item.style)"</div><div data-index="536"> :propValue="item.propValue"</div><div data-index="537"> /></div><div data-index="538"></div></div><div data-index="539">```</div><div data-index="540">保存代码的功能也特别简单,只需要保存画布上的数据 `componentData` 即可。保存有两种选择:</div><div data-index="541">1. 保存到服务器</div><div data-index="542">2. 本地保存</div><div><br></div><div data-index="543">在 DEMO 上我使用的 `localStorage` 保存在本地。</div><div><br></div><div data-index="544"></div><div data-index="545">## 10. 绑定事件</div><div data-index="546">每个组件有一个 `events` 对象,用于存储绑定的事件。目前我只定义了两个事件:</div><div data-index="547">* alert 事件</div><div data-index="548">* redirect 事件</div><div data-index="549">```js</div><div data-index="550">// 编辑器自定义事件</div><div data-index="551">const events = {</div><div data-index="552"> redirect(url) {</div><div data-index="553"> if (url) {</div><div data-index="554"> window.location.href = url</div><div data-index="555"> }</div><div data-index="556"> },</div><div><br></div><div data-index="557"> alert(msg) {</div><div data-index="558"> if (msg) {</div><div data-index="559"> alert(msg)</div><div data-index="560"> }</div><div data-index="561"> },</div><div data-index="562">}</div><div><br></div><div data-index="563">const mixins = {</div><div data-index="564"> methods: events,</div><div data-index="565">}</div><div><br></div><div data-index="566">const eventList = [</div><div data-index="567"> {</div><div data-index="568"> key: 'redirect',</div><div data-index="569"> label: '跳转事件',</div><div data-index="570"> event: events.redirect,</div><div data-index="571"> param: '',</div><div data-index="572"> },</div><div data-index="573"> {</div><div data-index="574"> key: 'alert',</div><div data-index="575"> label: 'alert 事件',</div><div data-index="576"> event: events.alert,</div><div data-index="577"> param: '',</div><div data-index="578"> },</div><div data-index="579">]</div><div><br></div><div data-index="580">export {</div><div data-index="581"> mixins,</div><div data-index="582"> events,</div><div data-index="583"> eventList,</div><div data-index="584">}</div><div data-index="585">```</div><div data-index="586">不过不能在编辑的时候触发,可以在预览的时候触发。</div><div><br></div><div data-index="587"></div><div><br></div><div data-index="588">### 添加事件</div><div data-index="589">通过 `v-for` 指令将事件列表渲染出来:</div><div data-index="590">```html</div><div data-index="591"><el-tabs v-model="eventActiveName"></div><div data-index="592"> <el-tab-pane v-for="item in eventList" :key="item.key" :label="item.label" :name="item.key" style="padding: 0 20px"></div><div data-index="593"> <el-input v-if="item.key == 'redirect'" v-model="item.param" type="textarea" placeholder="请输入完整的 URL" /></div><div data-index="594"> <el-input v-if="item.key == 'alert'" v-model="item.param" type="textarea" placeholder="请输入要 alert 的内容" /></div><div data-index="595"> <el-button style="margin-top: 20px;" @click="addEvent(item.key, item.param)">确定</el-button></div><div data-index="596"> </el-tab-pane></div><div data-index="597"></el-tabs></div><div data-index="598">```</div><div data-index="599">选中事件时将事件添加到组件的 `events` 对象。</div><div><br></div><div data-index="600">### 触发事件</div><div data-index="601">预览或真正渲染页面时,也需要在每个组件外面套一层 DIV,这样就可以在 DIV 上绑定一个点击事件,点击时触发我们刚才添加的事件。</div><div data-index="602">```html</div><div data-index="603"><template></div><div data-index="604"> <div @click="handleClick"></div><div data-index="605"> <component</div><div data-index="606"> class="conponent"</div><div data-index="607"> :is="config.component"</div><div data-index="608"> :style="getStyle(config.style)"</div><div data-index="609"> :propValue="config.propValue"</div><div data-index="610"> /></div><div data-index="611"> </div></div><div data-index="612"></template></div><div data-index="613">```</div><div data-index="614">```js</div><div data-index="615">handleClick() {</div><div data-index="616"> const events = this.config.events</div><div data-index="617"> // 循环触发绑定的事件</div><div data-index="618"> Object.keys(events).forEach(event => {</div><div data-index="619"> this[event](events[event])</div><div data-index="620"> })</div><div data-index="621">}</div><div data-index="622">```</div><div data-index="623">## 11. 绑定动画</div><div data-index="624">动画和事件的原理是一样的,先将所有的动画通过 `v-for` 指令渲染出来,然后点击动画将对应的动画添加到组件的 `animations` 数组里。同事件一样,执行的时候也是遍历组件所有的动画并执行。</div><div><br></div><div data-index="625">为了方便,我们使用了 [animate.css](https://animate.style/) 动画库。</div><div data-index="626">```js</div><div data-index="627">// main.js</div><div data-index="628">import '@/styles/animate.css'</div><div data-index="629">```</div><div><br></div><div data-index="630">现在我们提前定义好所有的动画数据:</div><div data-index="631">```js</div><div data-index="632">export default [</div><div data-index="633"> {</div><div data-index="634"> label: '进入',</div><div data-index="635"> children: [</div><div data-index="636"> { label: '渐显', value: 'fadeIn' },</div><div data-index="637"> { label: '向右进入', value: 'fadeInLeft' },</div><div data-index="638"> { label: '向左进入', value: 'fadeInRight' },</div><div data-index="639"> { label: '向上进入', value: 'fadeInUp' },</div><div data-index="640"> { label: '向下进入', value: 'fadeInDown' },</div><div data-index="641"> { label: '向右长距进入', value: 'fadeInLeftBig' },</div><div data-index="642"> { label: '向左长距进入', value: 'fadeInRightBig' },</div><div data-index="643"> { label: '向上长距进入', value: 'fadeInUpBig' },</div><div data-index="644"> { label: '向下长距进入', value: 'fadeInDownBig' },</div><div data-index="645"> { label: '旋转进入', value: 'rotateIn' },</div><div data-index="646"> { label: '左顺时针旋转', value: 'rotateInDownLeft' },</div><div data-index="647"> { label: '右逆时针旋转', value: 'rotateInDownRight' },</div><div data-index="648"> { label: '左逆时针旋转', value: 'rotateInUpLeft' },</div><div data-index="649"> { label: '右逆时针旋转', value: 'rotateInUpRight' },</div><div data-index="650"> { label: '弹入', value: 'bounceIn' },</div><div data-index="651"> { label: '向右弹入', value: 'bounceInLeft' },</div><div data-index="652"> { label: '向左弹入', value: 'bounceInRight' },</div><div data-index="653"> { label: '向上弹入', value: 'bounceInUp' },</div><div data-index="654"> { label: '向下弹入', value: 'bounceInDown' },</div><div data-index="655"> { label: '光速从右进入', value: 'lightSpeedInRight' },</div><div data-index="656"> { label: '光速从左进入', value: 'lightSpeedInLeft' },</div><div data-index="657"> { label: '光速从右退出', value: 'lightSpeedOutRight' },</div><div data-index="658"> { label: '光速从左退出', value: 'lightSpeedOutLeft' },</div><div data-index="659"> { label: 'Y轴旋转', value: 'flip' },</div><div data-index="660"> { label: '中心X轴旋转', value: 'flipInX' },</div><div data-index="661"> { label: '中心Y轴旋转', value: 'flipInY' },</div><div data-index="662"> { label: '左长半径旋转', value: 'rollIn' },</div><div data-index="663"> { label: '由小变大进入', value: 'zoomIn' },</div><div data-index="664"> { label: '左变大进入', value: 'zoomInLeft' },</div><div data-index="665"> { label: '右变大进入', value: 'zoomInRight' },</div><div data-index="666"> { label: '向上变大进入', value: 'zoomInUp' },</div><div data-index="667"> { label: '向下变大进入', value: 'zoomInDown' },</div><div data-index="668"> { label: '向右滑动展开', value: 'slideInLeft' },</div><div data-index="669"> { label: '向左滑动展开', value: 'slideInRight' },</div><div data-index="670"> { label: '向上滑动展开', value: 'slideInUp' },</div><div data-index="671"> { label: '向下滑动展开', value: 'slideInDown' },</div><div data-index="672"> ],</div><div data-index="673"> },</div><div data-index="674"> {</div><div data-index="675"> label: '强调',</div><div data-index="676"> children: [</div><div data-index="677"> { label: '弹跳', value: 'bounce' },</div><div data-index="678"> { label: '闪烁', value: 'flash' },</div><div data-index="679"> { label: '放大缩小', value: 'pulse' },</div><div data-index="680"> { label: '放大缩小弹簧', value: 'rubberBand' },</div><div data-index="681"> { label: '左右晃动', value: 'headShake' },</div><div data-index="682"> { label: '左右扇形摇摆', value: 'swing' },</div><div data-index="683"> { label: '放大晃动缩小', value: 'tada' },</div><div data-index="684"> { label: '扇形摇摆', value: 'wobble' },</div><div data-index="685"> { label: '左右上下晃动', value: 'jello' },</div><div data-index="686"> { label: 'Y轴旋转', value: 'flip' },</div><div data-index="687"> ],</div><div data-index="688"> },</div><div data-index="689"> {</div><div data-index="690"> label: '退出',</div><div data-index="691"> children: [</div><div data-index="692"> { label: '渐隐', value: 'fadeOut' },</div><div data-index="693"> { label: '向左退出', value: 'fadeOutLeft' },</div><div data-index="694"> { label: '向右退出', value: 'fadeOutRight' },</div><div data-index="695"> { label: '向上退出', value: 'fadeOutUp' },</div><div data-index="696"> { label: '向下退出', value: 'fadeOutDown' },</div><div data-index="697"> { label: '向左长距退出', value: 'fadeOutLeftBig' },</div><div data-index="698"> { label: '向右长距退出', value: 'fadeOutRightBig' },</div><div data-index="699"> { label: '向上长距退出', value: 'fadeOutUpBig' },</div><div data-index="700"> { label: '向下长距退出', value: 'fadeOutDownBig' },</div><div data-index="701"> { label: '旋转退出', value: 'rotateOut' },</div><div data-index="702"> { label: '左顺时针旋转', value: 'rotateOutDownLeft' },</div><div data-index="703"> { label: '右逆时针旋转', value: 'rotateOutDownRight' },</div><div data-index="704"> { label: '左逆时针旋转', value: 'rotateOutUpLeft' },</div><div data-index="705"> { label: '右逆时针旋转', value: 'rotateOutUpRight' },</div><div data-index="706"> { label: '弹出', value: 'bounceOut' },</div><div data-index="707"> { label: '向左弹出', value: 'bounceOutLeft' },</div><div data-index="708"> { label: '向右弹出', value: 'bounceOutRight' },</div><div data-index="709"> { label: '向上弹出', value: 'bounceOutUp' },</div><div data-index="710"> { label: '向下弹出', value: 'bounceOutDown' },</div><div data-index="711"> { label: '中心X轴旋转', value: 'flipOutX' },</div><div data-index="712"> { label: '中心Y轴旋转', value: 'flipOutY' },</div><div data-index="713"> { label: '左长半径旋转', value: 'rollOut' },</div><div data-index="714"> { label: '由小变大退出', value: 'zoomOut' },</div><div data-index="715"> { label: '左变大退出', value: 'zoomOutLeft' },</div><div data-index="716"> { label: '右变大退出', value: 'zoomOutRight' },</div><div data-index="717"> { label: '向上变大退出', value: 'zoomOutUp' },</div><div data-index="718"> { label: '向下变大退出', value: 'zoomOutDown' },</div><div data-index="719"> { label: '向左滑动收起', value: 'slideOutLeft' },</div><div data-index="720"> { label: '向右滑动收起', value: 'slideOutRight' },</div><div data-index="721"> { label: '向上滑动收起', value: 'slideOutUp' },</div><div data-index="722"> { label: '向下滑动收起', value: 'slideOutDown' },</div><div data-index="723"> ],</div><div data-index="724"> },</div><div data-index="725">]</div><div data-index="726">```</div><div data-index="727">然后用 `v-for` 指令渲染出来动画列表。</div><div><br></div><div data-index="728"></div><div><br></div><div data-index="729">### 添加动画</div><div data-index="730">```html</div><div data-index="731"><el-tabs v-model="animationActiveName"></div><div data-index="732"> <el-tab-pane v-for="item in animationClassData" :key="item.label" :label="item.label" :name="item.label"></div><div data-index="733"> <el-scrollbar class="animate-container"></div><div data-index="734"> <div</div><div data-index="735"> class="animate"</div><div data-index="736"> v-for="(animate, index) in item.children"</div><div data-index="737"> :key="index"</div><div data-index="738"> @mouseover="hoverPreviewAnimate = animate.value"</div><div data-index="739"> @click="addAnimation(animate)"</div><div data-index="740"> ></div><div data-index="741"> <div :class="[hoverPreviewAnimate === animate.value && animate.value + ' animated']"></div><div data-index="742"> {{ animate.label }}</div><div data-index="743"> </div></div><div data-index="744"> </div></div><div data-index="745"> </el-scrollbar></div><div data-index="746"> </el-tab-pane></div><div data-index="747"></el-tabs></div><div data-index="748">```</div><div data-index="749">点击动画将调用 `addAnimation(animate)` 将动画添加到组件的 `animations` 数组。</div><div><br></div><div data-index="750">### 触发动画</div><div data-index="751">运行动画的代码:</div><div data-index="752">```js</div><div data-index="753">export default async function runAnimation($el, animations = []) {</div><div data-index="754"> const play = (animation) => new Promise(resolve => {</div><div data-index="755"> $el.classList.add(animation.value, 'animated')</div><div data-index="756"> const removeAnimation = () => {</div><div data-index="757"> $el.removeEventListener('animationend', removeAnimation)</div><div data-index="758"> $el.removeEventListener('animationcancel', removeAnimation)</div><div data-index="759"> $el.classList.remove(animation.value, 'animated')</div><div data-index="760"> resolve()</div><div data-index="761"> }</div><div> </div><div data-index="762"> $el.addEventListener('animationend', removeAnimation)</div><div data-index="763"> $el.addEventListener('animationcancel', removeAnimation)</div><div data-index="764"> })</div><div><br></div><div data-index="765"> for (let i = 0, len = animations.length; i < len; i++) {</div><div data-index="766"> await play(animations[i])</div><div data-index="767"> }</div><div data-index="768">}</div><div data-index="769">```</div><div data-index="770">运行动画需要两个参数:组件对应的 DOM 元素(在组件使用 `this.$el` 获取)和它的动画数据 `animations`。并且需要监听 `animationend` 事件和 `animationcancel` 事件:一个是动画结束时触发,一个是动画意外终止时触发。</div><div><br></div><div data-index="771">利用这一点再配合 `Promise` 一起使用,就可以逐个运行组件的每个动画了。</div><div><br></div><div data-index="772">## 12. 导入 PSD</div><div data-index="773">由于时间关系,这个功能我还没做。现在简单的描述一下怎么做这个功能。那就是使用 [psd.js](https://github.com/meltingice/psd.js#readme) 库,它可以解析 PSD 文件。</div><div><br></div><div data-index="774">使用 `psd` 库解析 PSD 文件得出的数据如下:</div><div data-index="775">```js</div><div data-index="776">{ children: </div><div data-index="777"> [ { type: 'group',</div><div data-index="778"> visible: false,</div><div data-index="779"> opacity: 1,</div><div data-index="780"> blendingMode: 'normal',</div><div data-index="781"> name: 'Version D',</div><div data-index="782"> left: 0,</div><div data-index="783"> right: 900,</div><div data-index="784"> top: 0,</div><div data-index="785"> bottom: 600,</div><div data-index="786"> height: 600,</div><div data-index="787"> width: 900,</div><div data-index="788"> children: </div><div data-index="789"> [ { type: 'layer',</div><div data-index="790"> visible: true,</div><div data-index="791"> opacity: 1,</div><div data-index="792"> blendingMode: 'normal',</div><div data-index="793"> name: 'Make a change and save.',</div><div data-index="794"> left: 275,</div><div data-index="795"> right: 636,</div><div data-index="796"> top: 435,</div><div data-index="797"> bottom: 466,</div><div data-index="798"> height: 31,</div><div data-index="799"> width: 361,</div><div data-index="800"> mask: {},</div><div data-index="801"> text: </div><div data-index="802"> { value: 'Make a change and save.',</div><div data-index="803"> font: </div><div data-index="804"> { name: 'HelveticaNeue-Light',</div><div data-index="805"> sizes: [ 33 ],</div><div data-index="806"> colors: [ [ 85, 96, 110, 255 ] ],</div><div data-index="807"> alignment: [ 'center' ] },</div><div data-index="808"> left: 0,</div><div data-index="809"> top: 0,</div><div data-index="810"> right: 0,</div><div data-index="811"> bottom: 0,</div><div data-index="812"> transform: { xx: 1, xy: 0, yx: 0, yy: 1, tx: 456, ty: 459 } },</div><div data-index="813"> image: {} } ] } ],</div><div data-index="814"> document: </div><div data-index="815"> { width: 900,</div><div data-index="816"> height: 600,</div><div data-index="817"> resources: </div><div data-index="818"> { layerComps: </div><div data-index="819"> [ { id: 692243163, name: 'Version A', capturedInfo: 1 },</div><div data-index="820"> { id: 725235304, name: 'Version B', capturedInfo: 1 },</div><div data-index="821"> { id: 730932877, name: 'Version C', capturedInfo: 1 } ],</div><div data-index="822"> guides: [],</div><div data-index="823"> slices: [] } } }</div><div data-index="824">```</div><div data-index="825">从以上代码可以发现,这些数据和 css 非常像。根据这一点,只需要写一个转换函数,将这些数据转换成我们组件所需的数据,就能实现 PSD 文件转成渲染组件的功能。目前 [quark-h5](https://github.com/huangwei9527/quark-h5) 和 [luban-h5](https://github.com/ly525/luban-h5) 都是这样实现的 PSD 转换功能。</div><div data-index="826">## 13. 手机模式</div><div data-index="827">由于画布是可以调整大小的,我们可以使用 iphone6 的分辨率来开发手机页面。</div><div><br></div><div data-index="828"></div><div><br></div><div data-index="829">这样开发出来的页面也可以在手机下正常浏览,但可能会有样式偏差。因为我自定义的三个组件是没有做适配的,如果你需要开发手机页面,那自定义组件必须使用移动端的 UI 组件库。或者自己开发移动端专用的自定义组件。</div><div><br></div><div data-index="830">## 总结</div><div data-index="831">由于 DEMO 的代码比较多,所以在讲解每一个功能点时,我只把关键代码贴上来。所以大家会发现 DEMO 的源码和我贴上来的代码会有些区别,请不必在意。</div><div><br></div><div data-index="832">另外,DEMO 的样式也比较简陋,主要是最近事情比较多,没太多时间写好看点,请见谅。</div><div><br></div><div data-index="833">## 参考资料</div><div data-index="834">* [ref-line](https://github.com/think2011/ref-line)</div><div data-index="835">* [quark-h5](https://github.com/huangwei9527/quark-h5)</div><div data-index="836">* [luban-h5](https://github.com/ly525/luban-h5)</div><div data-index="837">* [易企秀](https://www.eqxiu.com/workstage/fast-make)</div><div data-index="838">* [drag 事件](https://developer.mozilla.org/zh-CN/docs/Web/API/Document/drag_event)</div>
</div>
<div id="show-content" class="text-container markdown"></div>
<script src="MarkdownParser.js"></script>
<script src="utils.js"></script>
<script src="index.js"></script>
</body>
</html>
html,
body {
height: 100%;
font-size: 0;
}
* {
margin: 0;
padding: 0;
font-family: 'Microsoft yahei';
}
body {
display: flex;
}
table {
border-collapse: collapse;
}
.text-container {
box-sizing: border-box;
width: 50%;
border: 1px solid #e6e6e6;
height: 100%;
font-size: 14px;
background: #f5f5f5;
padding: 10px;
line-height: 20px;
outline: none;
overflow: auto;
}
.text-container > div {
min-height: 20px;
}
::-webkit-scrollbar {
width: 5px;
height: 5px;
}
::-webkit-scrollbar-track {
background-color: transparent;
}
::-webkit-scrollbar-thumb {
border-radius: 4px;
background-color: #ddd;
}
.markdown {
font-family: -apple-system,BlinkMacSystemFont,Segoe UI,Helvetica,Arial,sans-serif,Apple Color Emoji,Segoe UI Emoji,Segoe UI Symbol;
font-size: 16px;
line-height: 1.5;
word-wrap: break-word;
background-color: #fff;
color: #24292f;
}
.markdown img {
max-width: 100%;
margin: 10px 0;
}
.markdown>:first-child {
margin-top: 0!important;
}
.markdown h1,
.markdown h2 {
border-bottom: 1px solid #eaecef;
padding-bottom: .3em;
}
.markdown h1,
.markdown h2,
.markdown h3,
.markdown h4,
.markdown h5,
.markdown h6 {
font-weight: 600;
line-height: 1.25;
margin-bottom: 16px;
margin-top: 24px;
}
.markdown div {
min-height: 20px;
}
code,
pre,
tt {
font-family: SFMono-Regular,Consolas,Liberation Mono,Menlo,Courier,monospace;
font-size: 14px;
}
.markdown pre {
background-color: #f6f8fa;
border-radius: 3px;
font-size: 85%;
line-height: 1.45;
overflow: auto;
padding: 16px;
color: #24292e;
font-size: 14px;
font-family: SFMono-Regular,Consolas,Liberation Mono,Menlo,Courier,monospace;
margin: 0;
margin-bottom: 1em;
}
.markdown code {
background-color: #f6f8fa;
border: 0;
display: inline;
line-height: inherit;
margin: 0;
max-width: auto;
overflow: visible;
padding: 0;
word-wrap: normal;
word-break: break-all;
}
.markdown blockquote {
background-color: #f6f8fa;
padding: 10px;
}
.markdown table {
display: block;
overflow: auto;
width: 100%;
margin-bottom: 15px;
}
.markdown table tr {
background-color: #fff;
}
.markdown table td,
.markdown table th {
border: 1px solid #dfe2e5;
padding: 6px 13px;
}
.markdown p {
margin-bottom: 1em;
}
.markdown li {
word-wrap: break-all;
}
.markdown ul li {
list-style: disc;
}
.markdown ol,
.markdown ul {
padding-left: 2em;
}
.markdown blockquote,
.markdown details,
.markdown dl,
.markdown ol,
.markdown p,
.markdown pre,
.markdown table,
.markdown ul {
margin-bottom: 16px;
margin-top: 0;
}
.markdown a {
color: #0366d6;
text-decoration: none;
}