console
class MarkdownParser {
compile(nodes) {
let matchArr
let html = ''
for (let i = 0, len = nodes.length; i < len; i++) {
let text = ''
let index = 0
const node = nodes[i]
if (node.nodeType === Node.ELEMENT_NODE) {
if (node.innerHTML === '<br>') {
html += `<div></div>`
while (nodes[i + 1].nodeType === Node.ELEMENT_NODE && nodes[i + 1].innerHTML === '<br>') {
i++
}
continue
}
index = node.dataset.index
text = node.textContent.trim()
} else {
text = node.nodeValue.trim()
}
matchArr = text.match(/^#\s/)
|| text.match(/^##\s/)
|| text.match(/^###\s/)
|| text.match(/^####\s/)
|| text.match(/^#####\s/)
|| text.match(/^######\s/)
|| text.match(/^\*{3,}/)
|| text.match(/^>/)
|| text.match(/^\*\s/)
|| text.match(/^\d*\.\s/)
|| text.match(/^```/)
|| text.match(/^\|.*\|/)
if (matchArr) {
let temp = ''
const re1 = /^>/
const re2 = /^\*\s/
const re3 = /^\d*\.\s/
const re4 = /^```/
const re5 = /^\|.*\|/
switch(matchArr[0]) {
case '# ':
html += `<h1 data-index="${index}">` + this.format(text.substring(2)) + '</h1>'
break
case '## ':
html += `<h2 data-index="${index}">` + this.format(text.substring(3)) + '</h2>'
break
case '### ':
html += `<h3 data-index="${index}">` + this.format(text.substring(4)) + '</h3>'
break
case '#### ':
html += `<h4 data-index="${index}">` + this.format(text.substring(5)) + '</h4>'
break
case '##### ':
html += `<h5 data-index="${index}">` + this.format(text.substring(6)) + '</h5>'
break
case '###### ':
html += `<h6 data-index="${index}">` + this.format(text.substring(7)) + '</h6>'
break
case text.match(/^\*{3,}/) && text.match(/^\*{3,}/)[0]:
html += text.replace(/^\*{3,}/g, '<hr>')
break
case '>':
while (i < len && nodes[i].textContent.match(re1)) {
const str = nodes[i].textContent
temp += '<div>' + this.format(str.slice(1)) + '</div>'
i++
}
i--
html += `<blockquote data-index="${index}">` + temp + '</blockquote>'
break
case '* ':
while (i < len && nodes[i].textContent?.match(re2)) {
const str = nodes[i].textContent
temp += `<li data-index="${nodes[i]?.dataset?.index}">` + this.format(str.slice(2)) + '</li>'
i++
}
i--
html += `<ul data-index="${index}">` + temp + '</ul>'
break
case text.match(/^\d*\.\s/) && text.match(/^\d*\.\s/)[0]:
while (i < len && nodes[i].textContent?.match(re3)) {
const str = nodes[i].textContent
temp += `<li data-index="${nodes[i]?.dataset?.index}">` + this.format(str.replace(/^\d*\.\s/, '')) + '</li>'
i++
}
i--
html += `<ol data-index="${index}">` + temp + '</ol>'
break
case '```':
i++
while (i < len && !re4.test(nodes[i].textContent)) {
temp += `<div data-index="${nodes[i]?.dataset?.index}">` + escapeHTML(nodes[i].textContent) + '</div>'
i++
}
html += `<pre data-index="${index}"><code>` + temp + '</code></pre>'
break
case text.match(/^\|.*\|/) && text.match(/^\|.*\|/)[0]:
let thRe = /^\[th\]/
let arr, j, jlen
while (i < len && re5.test(nodes[i].textContent)) {
arr = nodes[i].textContent.split('|')
temp += `<tr data-index="${nodes[i]?.dataset?.index}">`
for (j = 1, jlen = arr.length - 1; j < jlen; j++) {
if (thRe.test(arr[1])) {
temp += '<th>' + arr[j] + '</th>'
} else {
temp += '<td>' + arr[j] + '</td>'
}
}
temp += '</tr>'
temp = temp.replace('[th]', '')
i++
}
html += '<table>' + temp + '</table>'
break
}
} else if (text) {
html += `<div data-index="${index}">` + this.format(text) + '</div>'
}
}
return html
}
format(str) {
str = str.replace(/\s/g, ' ')
const bold = str.match(/\*{2}[^*].*?\*{2}/g)
if (bold) {
for (let i = 0, len = bold.length; i < len; i++) {
str = str.replace(bold[i], '<b>' + bold[i].substring(2, bold[i].length - 2) + '</b>')
}
}
const italic = str.match(/\*[^*].*?\*/g)
if (italic) {
for (let i = 0, len = italic.length; i < len; i++) {
str = str.replace(italic[i], '<i>' + italic[i].substring(1, italic[i].length - 1) + '</i>')
}
}
const code = str.match(/`[^`]*`/g)
if (code) {
for (let i = 0, len = code.length; i < len; i++) {
str = str.replace(code[i], '<code>' + code[i].substring(1, code[i].length - 1) + '</code>')
}
}
const img = str.match(/!\[.*\]\(.*\)/g)
const re1 = /\(.*\)/
const re2 = /\[.*\]/
if (img) {
for (let i = 0, len = img.length; i < len; i++) {
const url = img[i].match(re1)[0]
const title = img[i].match(re2)[0]
str = str.replace(img[i], '<img src=' + url.substring(1, url.length - 1) + ' alt=' + title.substring(1, title.length -1) + '>')
}
}
const a = str.match(/\[.*?\]\(.*?\)/g)
if (a) {
for (let i = 0, len = a.length; i < len; i++) {
const url = a[i].match(re1)[0]
const title = a[i].match(re2)[0]
str = str.replace(a[i], '<a href=' + url.substring(1, url.length - 1) + '>' + title.substring(1, title.length -1) + '</a>')
}
}
return escapeHTML2(str)
}
}
function escapeHTML(html) {
return html.replace(/</g, '<').replace(/>/g, '>')
}
function escapeHTML2(html) {
return html.replace(/<(\/)?script>/g, '<$1script>')
}
function $(selector) {
return document.querySelector(selector)
}
function changeCursorPosition(node) {
const selection = window.getSelection()
selection.removeAllRanges()
const range = document.createRange()
range.selectNode(node)
selection.addRange(range)
selection.collapseToEnd()
}
function clearTextStyle(e) {
e.preventDefault()
let text
const clp = (e.originalEvent || e).clipboardData
if (clp === undefined || clp === null) {
text = window.clipboardData.getData('text') || ''
if (text !== '') {
if (window.getSelection) {
var newNode = document.createElement('span')
newNode.innerHTML = text
window.getSelection().getRangeAt(0).insertNode(newNode)
} else {
document.selection.createRange().pasteHTML(text)
}
}
} else {
text = clp.getData('text/plain') || ''
if (text !== '') {
document.execCommand('insertText', false, text)
}
}
}
function throttle(delay) {
let waitForCallFunc
let canCall = true
return function helper(callback, ...args) {
if (!canCall) {
if (callback) waitForCallFunc = callback
return
}
callback(...args)
canCall = false
setTimeout(() => {
canCall = true
if (waitForCallFunc) {
helper(waitForCallFunc, ...args)
waitForCallFunc = null
}
}, delay)
}
}
function debounce(delay) {
let timer
return function(callback, ...args) {
clearTimeout(timer)
timer = setTimeout(() => callback.call(null, ...args), delay)
}
}
function getHeightToTop(dom) {
let height = dom.offsetTop
let parent = dom.offsetParent
while (parent) {
height += parent.offsetTop
parent = parent.offsetParent
}
return height
}
function isInScreen(dom) {
const { top, bottom } = dom.getBoundingClientRect()
return bottom >= 0 && top < window.innerHeight
}
function percentOfdomInScreen(dom) {
const { height, bottom } = dom.getBoundingClientRect()
if (bottom <= 0) return 0
if (bottom >= height) return 1
return bottom / height
}
function canNodeCalculate(node) {
return (
node.innerHTML
&& node.innerHTML !== '<br>'
&& !node.textContent.startsWith('```')
&& isInScreen(node)
&& percentOfdomInScreen(node) >= 0
)
}
const editor = $('#editor')
const showDom = $('#show-content')
const markdown = new MarkdownParser()
showDom.innerHTML = markdown.compile(editor.children)
function onInput() {
let index = 0
const data = Array.from(editor.children)
data.forEach(item => {
delete item.dataset.index
if (item.tagName !== 'BR' && item.innerText.trim() !== '') {
if (!item.children.length || (item.children.length === 1 && item.children[0].tagName === 'BR')) {
item.dataset.index = index++
return
}
const frag = document.createDocumentFragment()
Array.from(item.childNodes).forEach(e => {
if (e.nodeType === Node.TEXT_NODE) {
const div = document.createElement('div')
div.textContent = e.nodeValue
item.replaceChild(div, e)
div.dataset.index = index++
frag.appendChild(div)
} else if (item.tagName !== 'BR') {
e.dataset?.index && delete e.dataset.index
e.dataset.index = index++
frag.appendChild(e)
}
})
editor.replaceChild(frag, item)
changeCursorPosition(editor.querySelector(`[data-index="${index - 1}"]`))
}
})
showDom.innerHTML = markdown.compile(editor.childNodes)
}
const debounceFn = debounce(100)
editor.oninput = () => {
debounceFn(onInput)
}
editor.onpaste = (e) => {
clearTextStyle(e)
}
const canScroll = {
editor: true,
showDom: true,
}
const debounceFn2 = debounce(100)
const throttleFn = throttle(50)
editor.onscroll = () => {
if (!canScroll.editor) return
canScroll.showDom = false
throttleFn(onScroll, editor, showDom)
debounceFn2(resumeScroll)
}
showDom.onscroll = () => {
if (!canScroll.showDom) return
canScroll.editor = false
throttleFn(onScroll, showDom, editor)
debounceFn(resumeScroll)
}
function resumeScroll() {
canScroll.editor = true
canScroll.showDom = true
}
function onScroll(scrollContainer, ShowContainer) {
const scrollHeight = ShowContainer.scrollHeight
if (scrollContainer.offsetHeight + scrollContainer.scrollTop >= scrollContainer.scrollHeight) {
ShowContainer.scrollTo({ top: scrollHeight - ShowContainer.clientHeight })
return
}
if (scrollContainer.scrollTop === 0) {
ShowContainer.scrollTo({ top: 0 })
return
}
const nodes = Array.from(scrollContainer.children)
for (const node of nodes) {
if (canNodeCalculate(node)) {
if (node.tagName === 'PRE' || node.tagName === 'TABLE') {
if (hasPreElementInScrollContainerScroll(node, ShowContainer)) return
continue
}
const index = node.dataset.index
const dom = ShowContainer.querySelector(`[data-index="${index}"]`)
if (!dom) continue
const percent = percentOfdomInScreen(node)
const heightToTop = getHeightToTop(dom)
const domNeedHideHeight = dom.offsetHeight * (1 - percent)
ShowContainer.scrollTo({ top: heightToTop + domNeedHideHeight })
break
}
}
}
function hasPreElementInScrollContainerScroll(preElement, ShowContainer) {
for (const node of preElement.children[0].children) {
if (isInScreen(node) && percentOfdomInScreen(node) >= 0) {
const index = node.dataset.index
const dom = ShowContainer.querySelector(`[data-index="${index}"]`)
if (!dom) continue
const percent = percentOfdomInScreen(node)
const heightToTop = getHeightToTop(dom)
const domNeedHideHeight = dom.offsetHeight * (1 - percent)
ShowContainer.scrollTo({ top: heightToTop + domNeedHideHeight })
return true
}
}
return false
}
<!DOCTYPE html>
<html>
<head>
<meta charset="utf-8">
<title>markdown 编辑器双屏同步滚动 demo6</title>
<link rel="stylesheet" href="index.css">
</head>
<body>
<div id="editor" contenteditable class="text-container">
<div data-index="0">本文是可视化拖拽系列的第四篇,比起之前的三篇文章,这篇功能点要稍微少一点,总共有五点:</div><div data-index="1">1. SVG 组件</div><div data-index="2">2. 动态属性面板</div><div data-index="3">3. 数据来源(接口请求)</div><div data-index="4">4. 组件联动</div><div data-index="5">5. 组件按需加载</div><div><br></div><div data-index="6">如果你对我之前的系列文章不是很了解,建议先把这三篇文章看一遍,再来阅读本文(否则没有上下文,不太好理解):</div><div data-index="7">* [可视化拖拽组件库一些技术要点原理分析](https://github.com/woai3c/Front-end-articles/issues/19)</div><div data-index="8">* [可视化拖拽组件库一些技术要点原理分析(二)](https://github.com/woai3c/Front-end-articles/issues/20)</div><div data-index="9">* [可视化拖拽组件库一些技术要点原理分析(三)](https://github.com/woai3c/Front-end-articles/issues/21)</div><div><br></div><div data-index="10">另附上项目、在线 DEMO 地址:</div><div data-index="11">* [一个低代码(可视化拖拽)教学项目](https://github.com/woai3c/visual-drag-demo)</div><div data-index="12">* [在线 DEMO](https://woai3c.github.io/visual-drag-demo/)</div><div><br></div><div data-index="13">## SVG 组件</div><div data-index="14">目前项目里提供的自定义组件都是支持自由放大缩小的,不过他们有一个共同点——都是规则形状。也就是说对它们放大缩小,直接改变宽高就可以实现了,无需做其他处理。但是不规则形状就不一样了,譬如一个五角星,你得考虑放大缩小时,如何成比例的改变尺寸。最终,我采用了 svg 的方案来实现(还考虑过用 iconfont 来实现,不过有缺陷,放弃了),下面让我们来看看具体的实现细节。</div><div><br></div><div data-index="15">### 用 SVG 画一个五角星</div><div data-index="16">假设我们需要画一个 100 * 100 的五角星,它的代码是这样的:</div><div data-index="17">```html</div><div data-index="18"><svg </div><div data-index="19"> version="1.1" </div><div data-index="20"> baseProfile="full" </div><div data-index="21"> xmlns="http://www.w3.org/2000/svg"</div><div data-index="22">></div><div data-index="23"> <polygon </div><div data-index="24"> points="50 0,62.5 37.5,100 37.5,75 62.5,87.5 100,50 75,12.5 100,25 62.5,0 37.5,37.5 37.5" </div><div data-index="25"> stroke="#000" </div><div data-index="26"> fill="rgba(255, 255, 255, 1)" </div><div data-index="27"> stroke-width="1"</div><div data-index="28"> ></polygon></div><div data-index="29"></svg></div><div data-index="30">```</div><div data-index="31">svg 上的版本、命名空间之类的属性不是很重要,可以先忽略。重点是 polygon 这个元素,它在 svg 中定义了一个由`一组首尾相连的直线线段构成的闭合多边形形状`,最后一点连接到第一点。也就是说这个多边形由一系列坐标点组成,相连的点之间会自动连上。polygon 的 points 属性用来表示多边形的一系列坐标点,每个坐标点由 x y 坐标组成,每个坐标点之间用 `,`逗号分隔。</div><div><br></div><div data-index="32">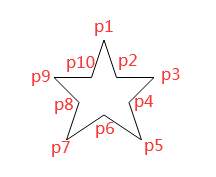</div><div><br></div><div data-index="33">上图就是一个用 svg 画的五角星,它由十个坐标点组成 `50 0,62.5 37.5,100 37.5,75 62.5,87.5 100,50 75,12.5 100,25 62.5,0 37.5,37.5 37.5`。由于这是一个 100*100 的五角星,所以我们能够很容易的根据每个坐标点的数值算出它们在五角星(坐标系)中所占的比例。譬如第一个点是 p1(`50,0`),那么它的 x y 坐标比例是 `50%, 0`;第二个点 p2(`62.5,37.5`),对应的比例是 `62.5%, 37.5%`...</div><div data-index="34">```js</div><div data-index="35">// 五角星十个坐标点的比例集合</div><div data-index="36">const points = [</div><div data-index="37"> [0.5, 0],</div><div data-index="38"> [0.625, 0.375],</div><div data-index="39"> [1, 0.375],</div><div data-index="40"> [0.75, 0.625],</div><div data-index="41"> [0.875, 1],</div><div data-index="42"> [0.5, 0.75],</div><div data-index="43"> [0.125, 1],</div><div data-index="44"> [0.25, 0.625],</div><div data-index="45"> [0, 0.375],</div><div data-index="46"> [0.375, 0.375],</div><div data-index="47">]</div><div data-index="48">```</div><div data-index="49">既然知道了五角星的比例,那么要画出其他尺寸的五角星也就易如反掌了。我们只需要在每次对五角星进行放大缩小,改变它的尺寸时,等比例的给出每个坐标点的具体数值即要。</div><div data-index="50">```html</div><div data-index="51"><div class="svg-star-container"></div><div data-index="52"> <svg</div><div data-index="53"> version="1.1"</div><div data-index="54"> baseProfile="full"</div><div data-index="55"> xmlns="http://www.w3.org/2000/svg"</div><div data-index="56"> ></div><div data-index="57"> <polygon</div><div data-index="58"> ref="star"</div><div data-index="59"> :points="points"</div><div data-index="60"> :stroke="element.style.borderColor"</div><div data-index="61"> :fill="element.style.backgroundColor"</div><div data-index="62"> stroke-width="1"</div><div data-index="63"> /></div><div data-index="64"> </svg></div><div data-index="65"> <v-text :prop-value="element.propValue" :element="element" /></div><div data-index="66"></div></div><div><br></div><div data-index="67"><script></div><div data-index="68">function drawPolygon(width, height) {</div><div data-index="69"> // 五角星十个坐标点的比例集合</div><div data-index="70"> const points = [</div><div data-index="71"> [0.5, 0],</div><div data-index="72"> [0.625, 0.375],</div><div data-index="73"> [1, 0.375],</div><div data-index="74"> [0.75, 0.625],</div><div data-index="75"> [0.875, 1],</div><div data-index="76"> [0.5, 0.75],</div><div data-index="77"> [0.125, 1],</div><div data-index="78"> [0.25, 0.625],</div><div data-index="79"> [0, 0.375],</div><div data-index="80"> [0.375, 0.375],</div><div data-index="81"> ]</div><div><br></div><div data-index="82"> const coordinatePoints = points.map(point => width * point[0] + ' ' + height * point[1])</div><div data-index="83"> this.points = coordinatePoints.toString() // 得出五角星的 points 属性数据</div><div data-index="84">}</div><div data-index="85"></script></div><div data-index="86">```</div><div><br></div><div data-index="87"></div><div><br></div><div data-index="88">### 其他 SVG 组件</div><div data-index="89">同理,要画其他类型的 svg 组件,我们只要知道它们坐标点所占的比例就可以了。如果你不知道一个 svg 怎么画,可以网上搜一下,先找一个能用的 svg 代码(这个五角星的 svg 代码,就是在网上找的)。然后再计算它们每个坐标点所占的比例,转成小数点的形式,最后把这些数据代入上面提供的 `drawPolygon()` 函数即可。譬如画一个三角形的代码是这样的:</div><div data-index="90">```js</div><div data-index="91">function drawTriangle(width, height) {</div><div data-index="92"> const points = [</div><div data-index="93"> [0.5, 0.05],</div><div data-index="94"> [1, 0.95],</div><div data-index="95"> [0, 0.95],</div><div data-index="96"> ]</div><div><br></div><div data-index="97"> const coordinatePoints = points.map(point => width * point[0] + ' ' + height * point[1])</div><div data-index="98"> this.points = coordinatePoints.toString() // 得出三角形的 points 属性数据</div><div data-index="99">}</div><div data-index="100">```</div><div><br></div><div data-index="101"></div><div><br></div><div data-index="102">## 动态属性面板</div><div data-index="103">目前所有自定义组件的属性面板都共用同一个 AttrList 组件。因此弊端很明显,需要在这里写很多 if 语句,因为不同的组件有不同的属性。例如矩形组件有 content 属性,但是图片没有,一个不同的属性就得写一个 if 语句。</div><div data-index="104">```html</div><div data-index="105"><el-form-item v-if="name === 'rectShape'" label="内容"></div><div data-index="106"> <el-input /></div><div data-index="107"></el-form-item></div><div data-index="108"><!-- 其他属性... --></div><div data-index="109">```</div><div data-index="110">幸好,这个问题的解决方案也不难。在本系列的第一篇文章中,有讲解过如何动态渲染自定义组件:</div><div data-index="111">```html</div><div data-index="112"><component :is="item.component"></component> <!-- 动态渲染组件 --></div><div data-index="113">```</div><div data-index="114">在每个自定义组件的数据结构中都有一个 `component` 属性,这是该组件在 Vue 中注册的名称。因此,每个自定义组件的属性面板可以和组件本身一样(利用 `component` 属性),做成动态的:</div><div data-index="115">```html</div><div data-index="116"><!-- 右侧属性列表 --></div><div data-index="117"><section class="right"></div><div data-index="118"> <el-tabs v-if="curComponent" v-model="activeName"></div><div data-index="119"> <el-tab-pane label="属性" name="attr"></div><div data-index="120"> <component :is="curComponent.component + 'Attr'" /> <!-- 动态渲染属性面板 --></div><div data-index="121"> </el-tab-pane></div><div data-index="122"> <el-tab-pane label="动画" name="animation" style="padding-top: 20px;"></div><div data-index="123"> <AnimationList /></div><div data-index="124"> </el-tab-pane></div><div data-index="125"> <el-tab-pane label="事件" name="events" style="padding-top: 20px;"></div><div data-index="126"> <EventList /></div><div data-index="127"> </el-tab-pane></div><div data-index="128"> </el-tabs></div><div data-index="129"> <CanvasAttr v-else></CanvasAttr></div><div data-index="130"></section></div><div data-index="131">```</div><div data-index="132">同时,自定义组件的目录结构也需要做下调整,原来的目录结构为:</div><div data-index="133">```</div><div data-index="134">- VText.vue</div><div data-index="135">- Picture.vue</div><div data-index="136">...</div><div data-index="137">```</div><div data-index="138">调整后变为:</div><div data-index="139">```html</div><div data-index="140">- VText</div><div data-index="141"> - Attr.vue <!-- 组件的属性面板 --></div><div data-index="142"> - Component.vue <!-- 组件本身 --></div><div data-index="143">- Picture</div><div data-index="144"> - Attr.vue</div><div data-index="145"> - Component.vue</div><div data-index="146">```</div><div data-index="147">现在每一个组件都包含了组件本身和它的属性面板。经过改造后,图片属性面板代码也更加精简了:</div><div data-index="148">```html</div><div data-index="149"><template></div><div data-index="150"> <div class="attr-list"></div><div data-index="151"> <CommonAttr></CommonAttr> <!-- 通用属性 --></div><div data-index="152"> <el-form></div><div data-index="153"> <el-form-item label="镜像翻转"></div><div data-index="154"> <div style="clear: both;"></div><div data-index="155"> <el-checkbox v-model="curComponent.propValue.flip.horizontal" label="horizontal">水平翻转</el-checkbox></div><div data-index="156"> <el-checkbox v-model="curComponent.propValue.flip.vertical" label="vertical">垂直翻转</el-checkbox></div><div data-index="157"> </div></div><div data-index="158"> </el-form-item></div><div data-index="159"> </el-form></div><div data-index="160"> </div></div><div data-index="161"></template></div><div data-index="162">```</div><div data-index="163">这样一来,组件和对应的属性面板都变成动态的了。以后需要单独给某个自定义组件添加属性就非常方便了。</div><div><br></div><div data-index="164"></div><div><br></div><div data-index="165">## 数据来源(接口请求)</div><div data-index="166">有些组件会有动态加载数据的需求,所以特地加了一个 `Request` 公共属性组件,用于请求数据。当一个自定义组件拥有 `request` 属性时,就会在属性面板上渲染接口请求的相关内容。至此,属性面板的公共组件已经有两个了:</div><div data-index="167">```html</div><div data-index="168">-common</div><div data-index="169"> - Request.vue <!-- 接口请求 --></div><div data-index="170"> - CommonAttr.vue <!-- 通用样式 --></div><div data-index="171">```</div><div data-index="172">```js</div><div data-index="173">// VText 自定义组件的数据结构</div><div data-index="174">{</div><div data-index="175"> component: 'VText',</div><div data-index="176"> label: '文字',</div><div data-index="177"> propValue: '双击编辑文字',</div><div data-index="178"> icon: 'wenben',</div><div data-index="179"> request: { // 接口请求</div><div data-index="180"> method: 'GET',</div><div data-index="181"> data: [],</div><div data-index="182"> url: '',</div><div data-index="183"> series: false, // 是否定时发送请求</div><div data-index="184"> time: 1000, // 定时更新时间</div><div data-index="185"> paramType: '', // string object array</div><div data-index="186"> requestCount: 0, // 请求次数限制,0 为无限</div><div data-index="187"> },</div><div data-index="188"> style: { // 通用样式</div><div data-index="189"> width: 200,</div><div data-index="190"> height: 28,</div><div data-index="191"> fontSize: '',</div><div data-index="192"> fontWeight: 400,</div><div data-index="193"> lineHeight: '',</div><div data-index="194"> letterSpacing: 0,</div><div data-index="195"> textAlign: '',</div><div data-index="196"> color: '',</div><div data-index="197"> },</div><div data-index="198">}</div><div data-index="199">```</div><div><br></div><div data-index="200"></div><div data-index="201">从上面的动图可以看出,api 请求的方法参数等都是可以手动修改的。但是怎么控制返回来的数据赋值给组件的某个属性呢?这可以在发出请求的时候把组件的整个数据对象 `obj` 以及要修改属性的 `key` 当成参数一起传进去,当数据返回来时,就可以直接使用 `obj[key] = data` 来修改数据了。</div><div data-index="202">```js</div><div data-index="203">// 第二个参数是要修改数据的父对象,第三个参数是修改数据的 key,第四个数据修改数据的类型</div><div data-index="204">this.cancelRequest = request(this.request, this.element, 'propValue', 'string')</div><div data-index="205">```</div><div data-index="206">## 组件联动</div><div data-index="207">组件联动:当一个组件触发事件时,另一个组件会收到通知,并且做出相应的操作。</div><div><br></div><div data-index="208"></div><div data-index="209">上面这个动图的矩形,它分别监听了下面两个按钮的悬浮事件,第一个按钮触发悬浮并广播事件,矩形执行回调向右旋转移动;第二个按钮则相反,向左旋转移动。</div><div><br></div><div data-index="210">要实现这个功能,首先要给自定义组件加一个新属性 `linkage`,用来记录所有要联动的组件:</div><div data-index="211">```js</div><div data-index="212">{</div><div data-index="213"> // 组件的其他属性...</div><div data-index="214"> linkage: {</div><div data-index="215"> duration: 0, // 过渡持续时间</div><div data-index="216"> data: [ // 组件联动</div><div data-index="217"> {</div><div data-index="218"> id: '', // 联动的组件 id</div><div data-index="219"> label: '', // 联动的组件名称</div><div data-index="220"> event: '', // 监听事件</div><div data-index="221"> style: [{ key: '', value: '' }], // 监听的事件触发时,需要改变的属性</div><div data-index="222"> },</div><div data-index="223"> ],</div><div data-index="224"> }</div><div data-index="225">}</div><div data-index="226">```</div><div data-index="227">对应的属性面板为:</div><div><br></div><div data-index="228">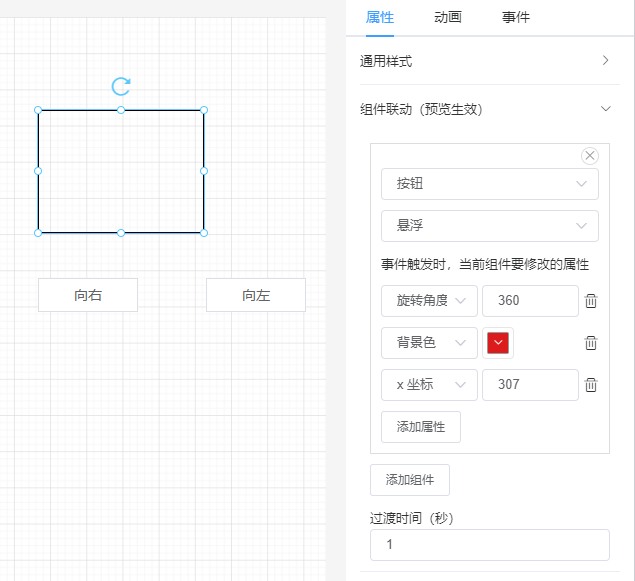</div><div data-index="229">组件联动本质上就是订阅/发布模式的运用,每个组件在渲染时都会遍历它监听的所有组件。</div><div data-index="230">### 事件监听</div><div data-index="231">```html</div><div data-index="232"><script></div><div data-index="233">import eventBus from '@/utils/eventBus'</div><div><br></div><div data-index="234">export default {</div><div data-index="235"> props: {</div><div data-index="236"> linkage: {</div><div data-index="237"> type: Object,</div><div data-index="238"> default: () => {},</div><div data-index="239"> },</div><div data-index="240"> element: {</div><div data-index="241"> type: Object,</div><div data-index="242"> default: () => {},</div><div data-index="243"> },</div><div data-index="244"> },</div><div data-index="245"> created() {</div><div data-index="246"> if (this.linkage?.data?.length) {</div><div data-index="247"> eventBus.$on('v-click', this.onClick)</div><div data-index="248"> eventBus.$on('v-hover', this.onHover)</div><div data-index="249"> }</div><div data-index="250"> },</div><div data-index="251"> mounted() {</div><div data-index="252"> const { data, duration } = this.linkage || {}</div><div data-index="253"> if (data?.length) {</div><div data-index="254"> this.$el.style.transition = `all ${duration}s`</div><div data-index="255"> }</div><div data-index="256"> },</div><div data-index="257"> beforeDestroy() {</div><div data-index="258"> if (this.linkage?.data?.length) {</div><div data-index="259"> eventBus.$off('v-click', this.onClick)</div><div data-index="260"> eventBus.$off('v-hover', this.onHover)</div><div data-index="261"> }</div><div data-index="262"> },</div><div data-index="263"> methods: {</div><div data-index="264"> changeStyle(data = []) {</div><div data-index="265"> data.forEach(item => {</div><div data-index="266"> item.style.forEach(e => {</div><div data-index="267"> if (e.key) {</div><div data-index="268"> this.element.style[e.key] = e.value</div><div data-index="269"> }</div><div data-index="270"> })</div><div data-index="271"> })</div><div data-index="272"> },</div><div><br></div><div data-index="273"> onClick(componentId) {</div><div data-index="274"> const data = this.linkage.data.filter(item => item.id === componentId && item.event === 'v-click')</div><div data-index="275"> this.changeStyle(data)</div><div data-index="276"> },</div><div><br></div><div data-index="277"> onHover(componentId) {</div><div data-index="278"> const data = this.linkage.data.filter(item => item.id === componentId && item.event === 'v-hover')</div><div data-index="279"> this.changeStyle(data)</div><div data-index="280"> },</div><div data-index="281"> },</div><div data-index="282">}</div><div data-index="283"></script></div><div data-index="284">```</div><div data-index="285">从上述代码可以看出:</div><div data-index="286">1. 每一个自定义组件初始化时,都会监听 `v-click` `v-hover` 两个事件(目前只有点击、悬浮两个事件)</div><div data-index="287">2. 事件回调函数触发时会收到一个参数——发出事件的组件 id(譬如多个组件都触发了点击事件,需要根据 id 来判断是否是自己监听的组件)</div><div data-index="288">3. 最后再修改对应的属性</div><div><br></div><div data-index="289">### 事件触发</div><div data-index="290">```html</div><div data-index="291"><template></div><div data-index="292"> <div @click="onClick" @mouseenter="onMouseEnter"></div><div data-index="293"> <component</div><div data-index="294"> :is="config.component"</div><div data-index="295"> ref="component"</div><div data-index="296"> class="component"</div><div data-index="297"> :style="getStyle(config.style)"</div><div data-index="298"> :prop-value="config.propValue"</div><div data-index="299"> :element="config"</div><div data-index="300"> :request="config.request"</div><div data-index="301"> :linkage="config.linkage"</div><div data-index="302"> /></div><div data-index="303"> </div></div><div data-index="304"></template></div><div><br></div><div data-index="305"><script></div><div data-index="306">import eventBus from '@/utils/eventBus'</div><div><br></div><div data-index="307">export default {</div><div data-index="308"> methods: {</div><div data-index="309"> onClick() {</div><div data-index="310"> const events = this.config.events</div><div data-index="311"> Object.keys(events).forEach(event => {</div><div data-index="312"> this[event](events[event])</div><div data-index="313"> })</div><div><br></div><div data-index="314"> eventBus.$emit('v-click', this.config.id)</div><div data-index="315"> },</div><div><br></div><div data-index="316"> onMouseEnter() {</div><div data-index="317"> eventBus.$emit('v-hover', this.config.id)</div><div data-index="318"> },</div><div data-index="319"> },</div><div data-index="320">}</div><div data-index="321"></script></div><div data-index="322">```</div><div data-index="323">从上述代码可以看出,在渲染组件时,每一个组件的最外层都监听了 `click` `mouseenter` 事件,当这些事件触发时,eventBus 就会触发对应的事件( v-click 或 v-hover ),并且把当前的组件 id 作为参数传过去。</div><div><br></div><div data-index="324">最后再捊一遍整体逻辑:</div><div data-index="325">1. a 组件监听原生事件 click mouseenter</div><div data-index="326">2. 用户点击或移动鼠标到组件上触发原生事件 click 或 mouseenter</div><div data-index="327">3. 事件回调函数再用 eventBus 触发 v-click 或 v-hover 事件</div><div data-index="328">4. 监听了这两个事件的 b 组件收到通知后再修改 b 组件的相关属性(例如上面矩形的 x 坐标和旋转角度)</div><div><br></div><div data-index="329">## 组件按需加载</div><div data-index="330">目前这个项目本身是没有做按需加载的,但是我把实现方案用文字的形式写出来其实也差不多。</div><div data-index="331">#### 第一步,抽离</div><div data-index="332">第一步需要把所有的自定义组件出离出来,单独存放。建议使用 monorepo 的方式来存放,所有的组件放在一个仓库里。每一个 package 就是一个组件,可以单独打包。</div><div data-index="333">```bash</div><div data-index="334">- node_modules</div><div data-index="335">- packages</div><div data-index="336"> - v-text # 一个组件就是一个包 </div><div data-index="337"> - v-button</div><div data-index="338"> - v-table</div><div data-index="339">- package.json</div><div data-index="340">- lerna.json</div><div data-index="341">```</div><div data-index="342">#### 第二步,打包</div><div data-index="343">建议每个组件都打包成一个 js 文件 ,例如叫 bundle.js。打包好直接调用上传接口放到服务器存起来(发布到 npm 也可以),每个组件都有一个唯一 id。前端每次渲染组件的时,通过这个组件 id 向服务器请求组件资源的 URL。</div><div data-index="344">#### 第三步,动态加载组件</div><div data-index="345">动态加载组件有两种方式:</div><div data-index="346">1. `import()`</div><div data-index="347">2. `<script>` 标签</div><div><br></div><div data-index="348">第一种方式实现起来比较方便:</div><div data-index="349">```js</div><div data-index="350">const name = 'v-text' // 组件名称</div><div data-index="351">const component = await import('https://xxx.xxx/bundile.js')</div><div data-index="352">Vue.component(name, component)</div><div data-index="353">```</div><div data-index="354">但是兼容性上有点小问题,如果要支持一些旧的浏览器(例如 IE),可以使用 `<script>` 标签的形式来加载:</div><div data-index="355">```js</div><div data-index="356">function loadjs(url) {</div><div data-index="357"> return new Promise((resolve, reject) => {</div><div data-index="358"> const script = document.createElement('script')</div><div data-index="359"> script.src = url</div><div data-index="360"> script.onload = resolve</div><div data-index="361"> script.onerror = reject</div><div data-index="362"> })</div><div data-index="363">}</div><div><br></div><div data-index="364">const name = 'v-text' // 组件名称</div><div data-index="365">await loadjs('https://xxx.xxx/bundile.js')</div><div data-index="366">// 这种方式加载组件,会直接将组件挂载在全局变量 window 下,所以 window[name] 取值后就是组件</div><div data-index="367">Vue.component(name, window[name])</div><div data-index="368">```</div><div data-index="369">为了同时支持这两种加载方式,在加载组件时需要判断一下浏览器是否支持 ES6。如果支持就用第一种方式,如果不支持就用第二种方式:</div><div data-index="370">```js</div><div data-index="371">function isSupportES6() {</div><div data-index="372"> try {</div><div data-index="373"> new Function('const fn = () => {};')</div><div data-index="374"> } catch (error) {</div><div data-index="375"> return false</div><div data-index="376"> }</div><div><br></div><div data-index="377"> return true</div><div data-index="378">}</div><div data-index="379">```</div><div data-index="380">最后一点,打包也要同时兼容这两种加载方式:</div><div data-index="381">```js</div><div data-index="382">import VText from './VText.vue'</div><div><br></div><div data-index="383">if (typeof window !== 'undefined') {</div><div data-index="384"> window['VText'] = VText</div><div data-index="385">}</div><div><br></div><div data-index="386">export default VText</div><div data-index="387">```</div><div data-index="388">同时导出组件和把组件挂在 window 下。</div><div data-index="389">## 其他小优化</div><div data-index="390">### 图片镜像翻转</div><div data-index="391"></div><div data-index="392">图片镜像翻转需要使用 canvas 来实现,主要使用的是 canvas 的 `translate()` `scale()` 两个方法。假设我们要对一个 100*100 的图片进行水平镜像翻转,它的代码是这样的:</div><div data-index="393">```html</div><div data-index="394"><canvas width="100" height="100"></canvas></div><div><br></div><div data-index="395"><script></div><div data-index="396"> const canvas = document.querySelector('canvas')</div><div data-index="397"> const ctx = canvas.getContext('2d')</div><div data-index="398"> const img = document.createElement('img')</div><div data-index="399"> const width = 100</div><div data-index="400"> const height = 100</div><div data-index="401"> img.src = 'https://avatars.githubusercontent.com/u/22117876?v=4'</div><div data-index="402"> img.onload = () => ctx.drawImage(img, 0, 0, width, height)</div><div><br></div><div data-index="403"> // 水平翻转</div><div data-index="404"> setTimeout(() => {</div><div data-index="405"> // 清除图片</div><div data-index="406"> ctx.clearRect(0, 0, width, height)</div><div data-index="407"> // 平移图片</div><div data-index="408"> ctx.translate(width, 0)</div><div data-index="409"> // 对称镜像</div><div data-index="410"> ctx.scale(-1, 1)</div><div data-index="411"> ctx.drawImage(img, 0, 0, width, height)</div><div data-index="412"> // 还原坐标点</div><div data-index="413"> ctx.setTransform(1, 0, 0, 1, 0, 0)</div><div data-index="414"> }, 2000)</div><div data-index="415"></script></div><div data-index="416">```</div><div data-index="417">`ctx.translate(width, 0)` 这行代码的意思是把图片的 x 坐标往前移动 width 个像素,所以平移后,图片就刚好在画布外面。然后这时使用 `ctx.scale(-1, 1)` 对图片进行水平翻转,就能得到一个水平翻转后的图片了。</div><div><br></div><div data-index="418"></div><div><br></div><div><br></div><div data-index="419">垂直翻转也是一样的原理,只不过参数不一样:</div><div data-index="420">```js</div><div data-index="421">// 原来水平翻转是 ctx.translate(width, 0)</div><div data-index="422">ctx.translate(0, height) </div><div data-index="423">// 原来水平翻转是 ctx.scale(-1, 1)</div><div data-index="424">ctx.scale(1, -1)</div><div data-index="425">```</div><div data-index="426">### 实时组件列表</div><div data-index="427">画布中的每一个组件都是有层级的,但是每个组件的具体层级并不会实时显现出来。因此,就有了这个实时组件列表的功能。</div><div><br></div><div data-index="428">这个功能实现起来并不难,它的原理和画布渲染组件是一样的,只不过这个列表只需要渲染图标和名称。</div><div data-index="429">```html</div><div data-index="430"><div class="real-time-component-list"></div><div data-index="431"> <div</div><div data-index="432"> v-for="(item, index) in componentData"</div><div data-index="433"> :key="index"</div><div data-index="434"> class="list"</div><div data-index="435"> :class="{ actived: index === curComponentIndex }"</div><div data-index="436"> @click="onClick(index)"</div><div data-index="437"> ></div><div data-index="438"> <span class="iconfont" :class="'icon-' + getComponent(index).icon"></span></div><div data-index="439"> <span>{{ getComponent(index).label }}</span></div><div data-index="440"> </div></div><div data-index="441"></div></div><div data-index="442">```</div><div data-index="443">但是有一点要注意,在组件数据的数组里,越靠后的组件层级越高。所以不对数组的数据索引做处理的话,用户看到的场景是这样的(**假设添加组件的顺序为文本、按钮、图片**):</div><div><br></div><div data-index="444">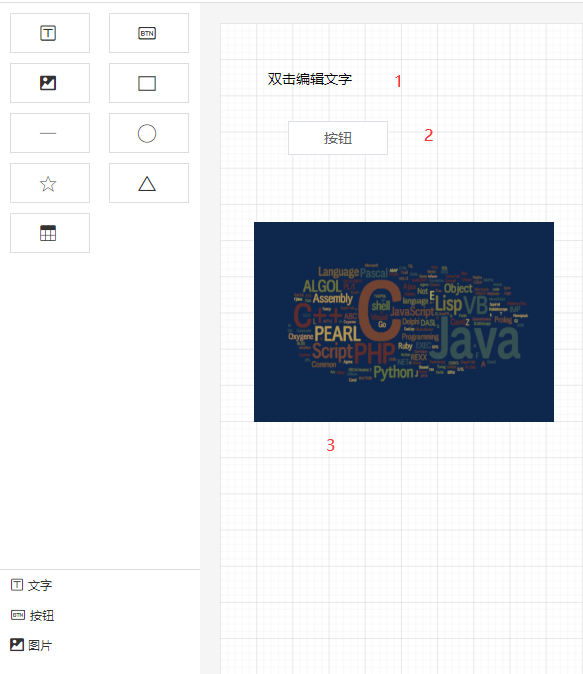</div><div data-index="445">从用户的角度来看,层级最高的图片,在实时列表里排在最后。这跟我们平时的认知不太一样。所以,我们需要对组件数据做个 `reverse()` 翻转一下。譬如文字组件的索引为 0,层级最低,它应该显示在底部。那么每次在实时列表展示时,我们可以通过下面的代码转换一下,得到翻转后的索引,然后再渲染,这样的排序看起来就比较舒服了。</div><div data-index="446">```html</div><div data-index="447"><div class="real-time-component-list"></div><div data-index="448"> <div</div><div data-index="449"> v-for="(item, index) in componentData"</div><div data-index="450"> :key="index"</div><div data-index="451"> class="list"</div><div data-index="452"> :class="{ actived: transformIndex(index) === curComponentIndex }"</div><div data-index="453"> @click="onClick(transformIndex(index))"</div><div data-index="454"> ></div><div data-index="455"> <span class="iconfont" :class="'icon-' + getComponent(index).icon"></span></div><div data-index="456"> <span>{{ getComponent(index).label }}</span></div><div data-index="457"> </div></div><div data-index="458"></div></div><div><br></div><div data-index="459"><script></div><div data-index="460">function getComponent(index) {</div><div data-index="461"> return componentData[componentData.length - 1 - index]</div><div data-index="462">}</div><div><br></div><div data-index="463">function transformIndex(index) {</div><div data-index="464"> return componentData.length - 1 - index</div><div data-index="465">}</div><div data-index="466"></script></div><div data-index="467">```</div><div data-index="468">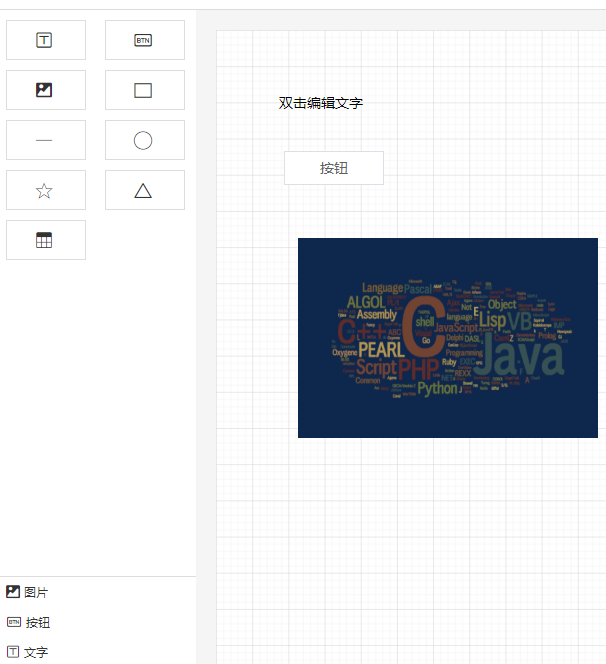</div><div data-index="469">经过转换后,层级最高的图片在实时列表里排在最上面,完美!</div><div data-index="470">## 总结</div><div data-index="471">至此,可视化拖拽系列的第四篇文章已经结束了,距离上一篇系列文章的发布时间(2021年02月15日)已经有一年多了。没想到这个项目这么受欢迎,在短短一年的时间里获得了很多网友的认可。所以希望本系列的第四篇文章还是能像之前一样,对大家有帮助,再次感谢!</div><div><br></div><div data-index="472">**最后**,毛遂自荐一下自己,本人五年+前端,有基础架构和带团队的经验。有没有大佬有北京、天津的前端岗位推荐。如果有,请在评论区留言,或者私信帮忙内推一下,感谢!</div><div><br></div><div data-index="473">本人的社交主页:</div><div data-index="474">* [Github](https://github.com/woai3c)</div><div data-index="475">* [知乎](https://www.zhihu.com/people/tan-guang-zhi-19)</div><div data-index="476">* [掘金](https://juejin.cn/user/1433418893103645)</div>
</div>
<div id="show-content" class="text-container markdown"></div>
</body>
</html>
html,
body {
height: 100%;
font-size: 0;
}
* {
margin: 0;
padding: 0;
font-family: 'Microsoft yahei';
}
body {
display: flex;
}
table {
border-collapse: collapse;
}
.text-container {
box-sizing: border-box;
width: 50%;
border: 1px solid #e6e6e6;
height: 100%;
font-size: 14px;
background: #f5f5f5;
padding: 10px;
line-height: 20px;
outline: none;
overflow: auto;
}
.text-container > div {
min-height: 20px;
}
::-webkit-scrollbar {
width: 5px;
height: 5px;
}
::-webkit-scrollbar-track {
background-color: transparent;
}
::-webkit-scrollbar-thumb {
border-radius: 4px;
background-color: #ddd;
}
.markdown {
font-family: -apple-system,BlinkMacSystemFont,Segoe UI,Helvetica,Arial,sans-serif,Apple Color Emoji,Segoe UI Emoji,Segoe UI Symbol;
font-size: 16px;
line-height: 1.5;
word-wrap: break-word;
background-color: #fff;
color: #24292f;
}
.markdown img {
max-width: 100%;
margin: 10px 0;
}
.markdown>:first-child {
margin-top: 0!important;
}
.markdown h1,
.markdown h2 {
border-bottom: 1px solid #eaecef;
padding-bottom: .3em;
}
.markdown h1,
.markdown h2,
.markdown h3,
.markdown h4,
.markdown h5,
.markdown h6 {
font-weight: 600;
line-height: 1.25;
margin-bottom: 16px;
margin-top: 24px;
}
.markdown div {
min-height: 20px;
}
code,
pre,
tt {
font-family: SFMono-Regular,Consolas,Liberation Mono,Menlo,Courier,monospace;
font-size: 14px;
}
.markdown pre {
background-color: #f6f8fa;
border-radius: 3px;
font-size: 85%;
line-height: 1.45;
overflow: auto;
padding: 16px;
color: #24292e;
font-size: 14px;
font-family: SFMono-Regular,Consolas,Liberation Mono,Menlo,Courier,monospace;
margin: 0;
margin-bottom: 1em;
}
.markdown code {
background-color: #f6f8fa;
border: 0;
display: inline;
line-height: inherit;
margin: 0;
max-width: auto;
overflow: visible;
padding: 0;
word-wrap: normal;
word-break: break-all;
}
.markdown blockquote {
background-color: #f6f8fa;
padding: 10px;
}
.markdown table {
display: block;
overflow: auto;
width: 100%;
margin-bottom: 15px;
}
.markdown table tr {
background-color: #fff;
}
.markdown table td,
.markdown table th {
border: 1px solid #dfe2e5;
padding: 6px 13px;
}
.markdown p {
margin-bottom: 1em;
}
.markdown li {
word-wrap: break-all;
}
.markdown ul li {
list-style: disc;
}
.markdown ol,
.markdown ul {
padding-left: 2em;
}
.markdown blockquote,
.markdown details,
.markdown dl,
.markdown ol,
.markdown p,
.markdown pre,
.markdown table,
.markdown ul {
margin-bottom: 16px;
margin-top: 0;
}
.markdown a {
color: #0366d6;
text-decoration: none;
}